Users and Permissions
In ClearVantage, users are considered a sub-set of employees. Every user must be linked to an employee record.
To create a new user, start by creating the user record and linking it to an employee. If an employee record does not already exist, it can be created directly through the user notebook during the linking process. Each user must be assigned a role and password as part of the user record creation.
User Management
Add ClearVantage Users
To create a ClearVantage login for a staff member, add a user record. During the user creation process, link the user to an employee by either selecting an existing employee or creating a new employee record directly from the user creation form.
-
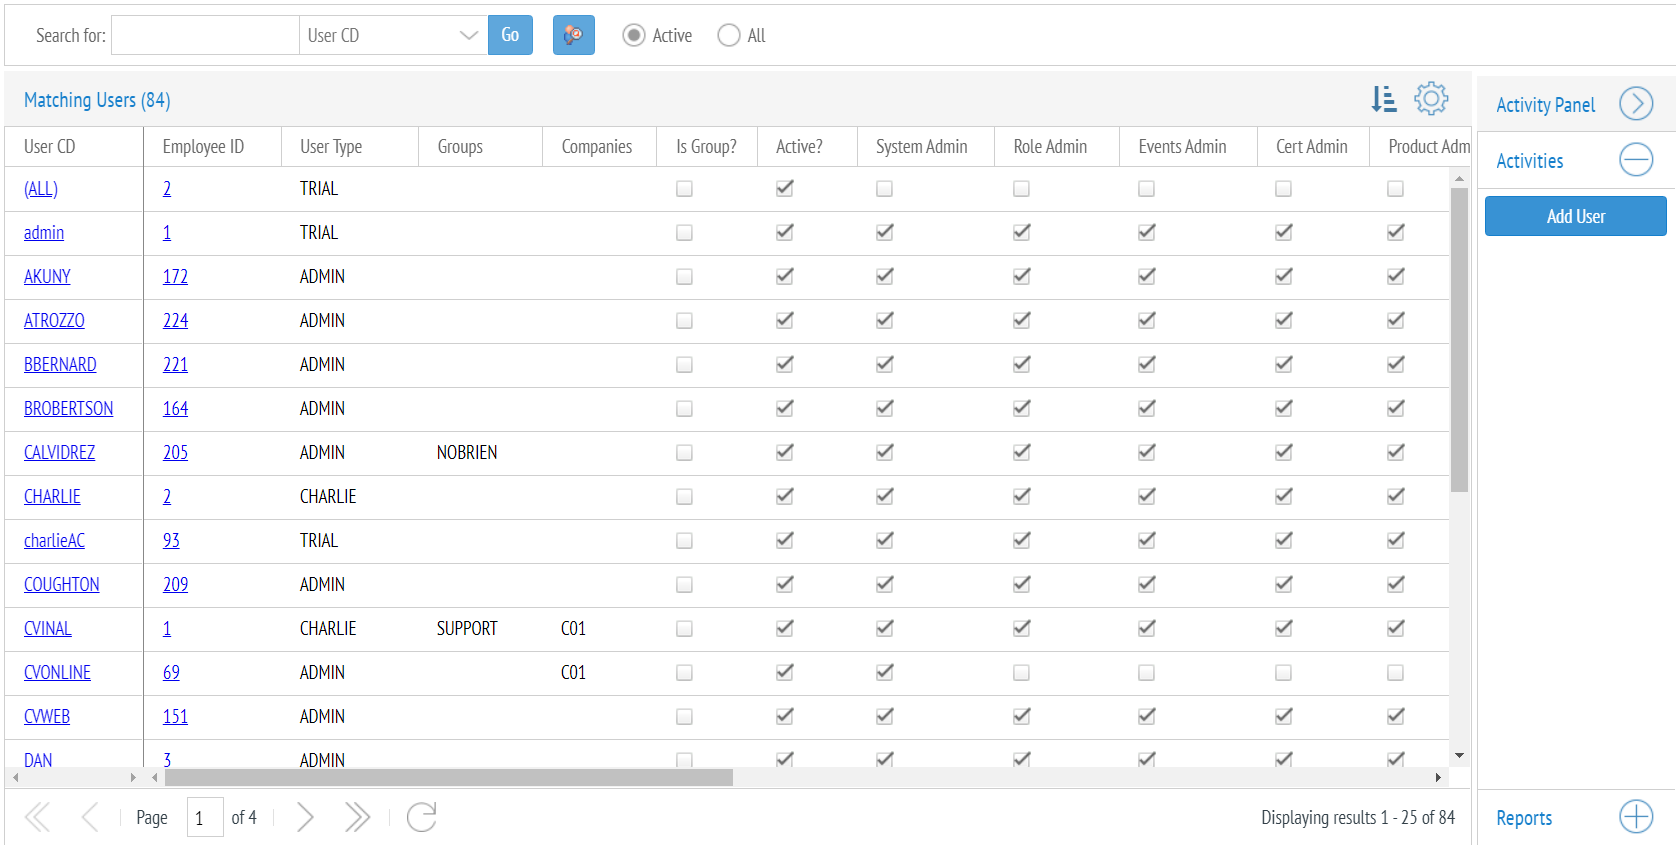
From the main menu, click "Admin" and select "Edit Users & User Groups".
-
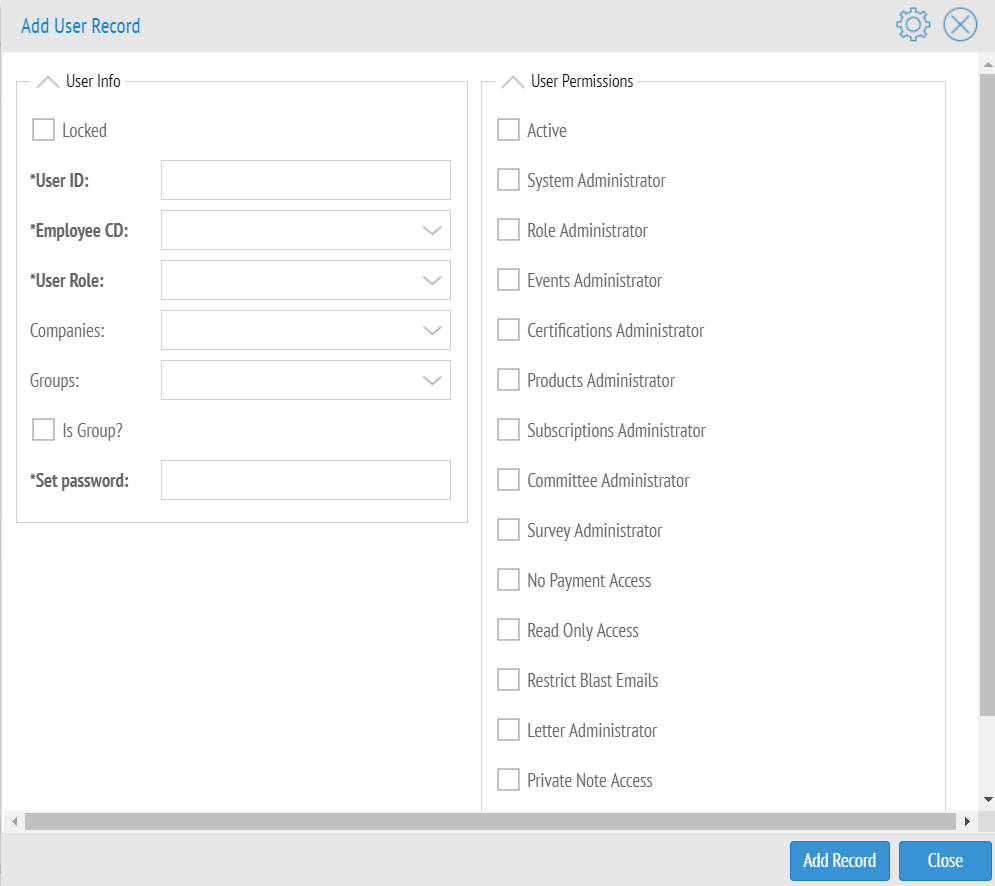
Click the "Add User" button from the "Activity Panel" on the right-hand side of the users list. This will open a blank user notebook.
-
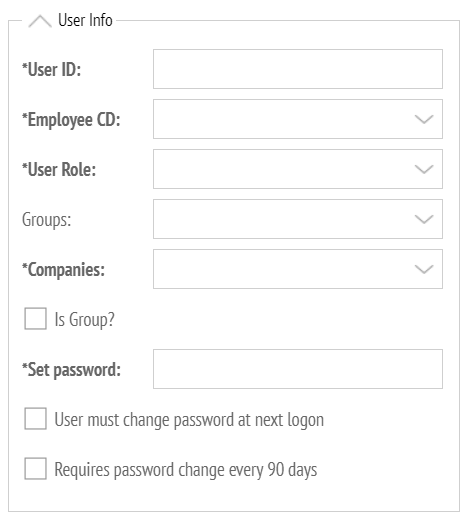
Enter the necessary field in the "User Info" section.
-
User ID: Enter a username for the new login. User logins have a maximum of 10 characters and cannot include spaces. This is a required field.
Note
If you want to change a staff member's User ID, you should deactivate the existing login record and create a new one rather than changing the User ID.
-
Employee CD: To link an employee to the user, click the "Link Employee" button next to the field. This button allows you to:
- Link to an existing employee record, or
- Create and link a new employee record
When creating a new employee from the "Link Employee" button, a blank employee record will open. Fill out the appropriate fields and select "Add Employee".
-
User Role: Select a role from the dropdown. This is a required field.
-
Groups: Select the groups that the user should be a part of. For more on user groups, see the User Groups section in this guide.
-
Companies: Select companies that the user may access. The system applies a filter on the individual and organization notebooks and displays information for the records based on the companies selected. This requires additional configuration.
Note
Companies refers to the financial entities configured as part of your system. At least one user should have access to all companies. Invoices and payments can be created without having an assigned company. These records are not be visible to a user who is only able to view specific companies.
-
Set Password: Enter a password that is at least 12 characters in length and contains upper and lower-case letters, at least one number and at least one special character. The user can update their password once they have logged in.
-
-
For each user, you can assign individual security access by checking the permission flags for the following areas:
-
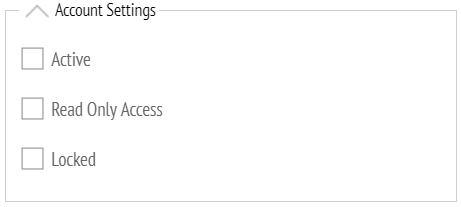
Account Settings
-
Active: Determines if user can log into ClearVantage. Each active user counts against client licensing limit.
Warning
Former employees should be marked as "Inactive" rather than deleted.
-
Locked: A user is locked if an incorrect password is entered 3 times. You must uncheck the box and save the record for the user to be able to log in again.
-
Read Only Access: Ability to read all information, but no ability to make changes to data.
Note
Users with read only access can create action items.
-
-
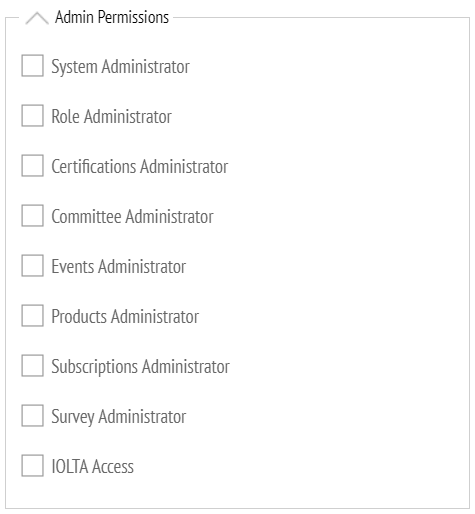
Admin Permissions
-
System Administrator: Access to all system functionality. The Admin option in the main menu is available if this flag is checked.
-
Role Administrator: Allows you to see the "Edit Layout" button on notebooks and save list layouts for your role.
-
Award Administrator: Allows you to add/edit/delete award records. Users without this permission may still add/edit/delete award nominees and documents.
-
Certifications Administrator: Ability to delete a certification record.
-
Committee Administrator: Ability to add/edit/delete committee records.
-
Events Administrator:
-
Allows you to add/edit/delete event records and duplicate events.
-
Allows you to add/edit/delete event program types.
-
Allows you to add/edit/ delete event prices, functions, trainers, and all other records associated with an event.
-
-
Products Administrator: Ability to add/edit/delete product records.
-
Subscription Administrator: Ability to add/edit/delete subscription type records.
-
Survey Administrator: Ability to add/edit/delete survey records and ability to add/edit/delete survey questions.
-
IOLTA Access: Gives access to all IOLTA functionality. This only applies to clients that have IOLTA configured.
-
-
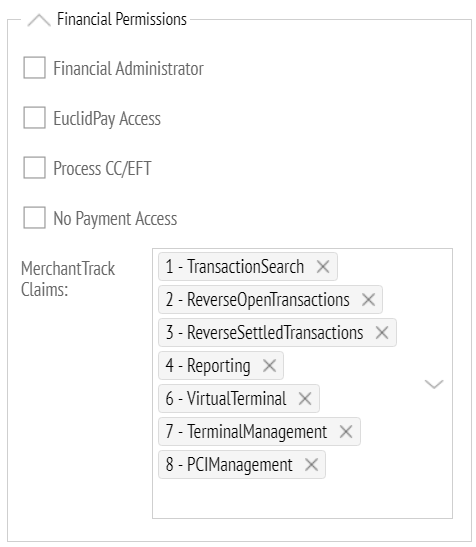
Financial Permissions
-
Financial Administrator:
-
Access to the Financial Reports option in the "Reports" main menu item.
-
Access to the Accounting option in the "Financials" main menu item (if configured).
-
Access to the Delete Dues Batch option in the "Process" menu item.
-
Access to the Process Payments option in the "Payments" menu item.
-
Allows you to view filters, All, Posted and Approved, for payments batches.
-
Allows you to approve, and un-approve payment batches.
-
Allows you to set GL mapping for entities via Set Accounting Code notebook buttons.
-
The CV Online setting REFUND_RESTRICT_TO_ADMIN is enabled, can grant access to the Process CC Refund button on the invoice notebook.
-
-
EuclidPay Access: Enables the euclidPay Account link under the Financials Main Menu Dropdown. This only applies to clients that have euclidPay configured.
-
Process CC/EFT: Ability to charge to credit card payment types in checkout UI.
-
No Payment Access:
-
User can only create invoices via checkout UI and can't accept any payment of any kind.
-
User can only view payment batches and cannot start a batch.
-
-
MerchantTrack Claims: Access to specific modules within euclidPay MerchantTrack (the EuclidPay account). This only applies to clients that have euclidPay configured.
-
Transaction Search
-
Reverse Open Transactions
-
Reverse Settled Transactions
-
Reporting
-
Virtual Terminal
-
Terminal Management
-
PCI Management
-
-
-
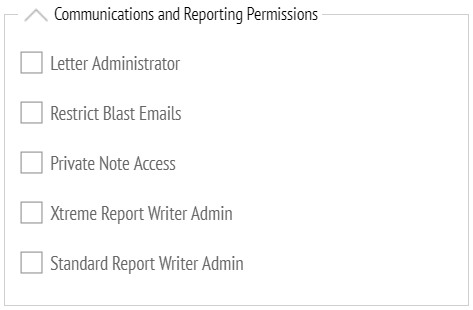
Communications and Reporting Permissions
-
Letter Administrator: Access to Processes > Email Batch Manager, manage email blast from addresses, names and reply addresses lists. Access to manage email templates.
-
Query Administrator: Allows the creation and duplication of gadgets and saved lists, as well as the management of the underlying queries for saved lists and gadgets, including updating the existing query.
-
Restrict Blast Emails: Removes ability for user to send emails. Specifically -
-
User cannot access Send Email Blast button from individual list.
-
User cannot access Create Email button from appeal list/notebook.
-
User cannot access Email Invoices button from invoice list.
-
User cannot access Email Invoice button from invoice notebook.
-
User cannot access Email Committee button from committee list/notebook.
-
-
Private Note Access: In CVPro, user may view action item private notes via View Private Note button.
-
No Action Item Delete: User cannot delete action items.
-
Xtreme Report Writer Admin: Access to the Xtreme Report Writer tool in CVPro (in Information Central).
-
Standard Report Writer Admin: Access to the Standard Report Writer tool in CVPro (in Information Central).
-
-
Note
Creating a user record will allow a staff member to login for ClearVantage. This does not create a web login for the staff member to the web membership dashboard.
Copy a ClearVantage User
Staff can create a new user record by copying an existing user record:
-
From the main menu, click "Admin" and select "Edit Users & User Groups".
-
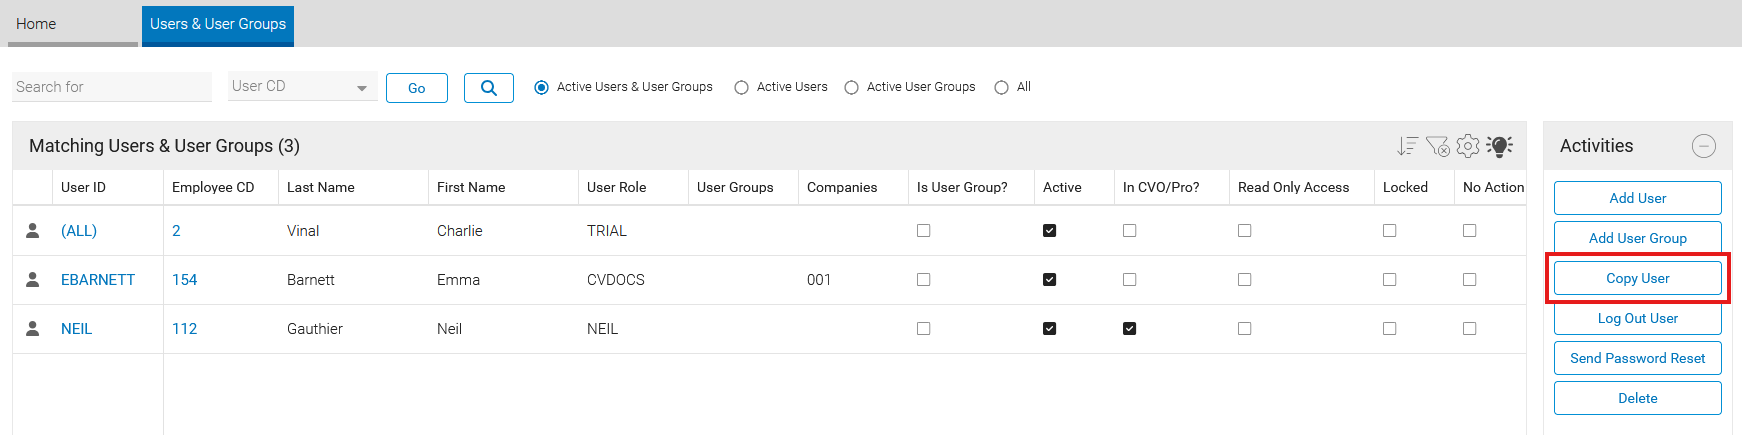
Click the row of the existing user you want to copy, then select "Copy User" from the "Activity Panel" on the right-hand side of the users list.
-
This will open a new user record and copy over the existing user's user role, companies and permissions. The new user is automatically set to active.
-
Fill in the remaining fields in the "User Info" section, including "User ID", "Link Employee", and "Set Password".
-
Click the "Copy Record" button at the bottom right-hand corner to save and close the new user record.
Note
When a user is copied, their home dashboard layout is also copied to the new user. This ensures the new user starts with the same set of dashboard gadget reports and dashboard layout configuration as the original user.
User Groups
User groups allow you to send action items to multiple individuals at once.
To create a user group:
-
From the main menu, click "Admin" and select "Edit Users & User Groups".
-
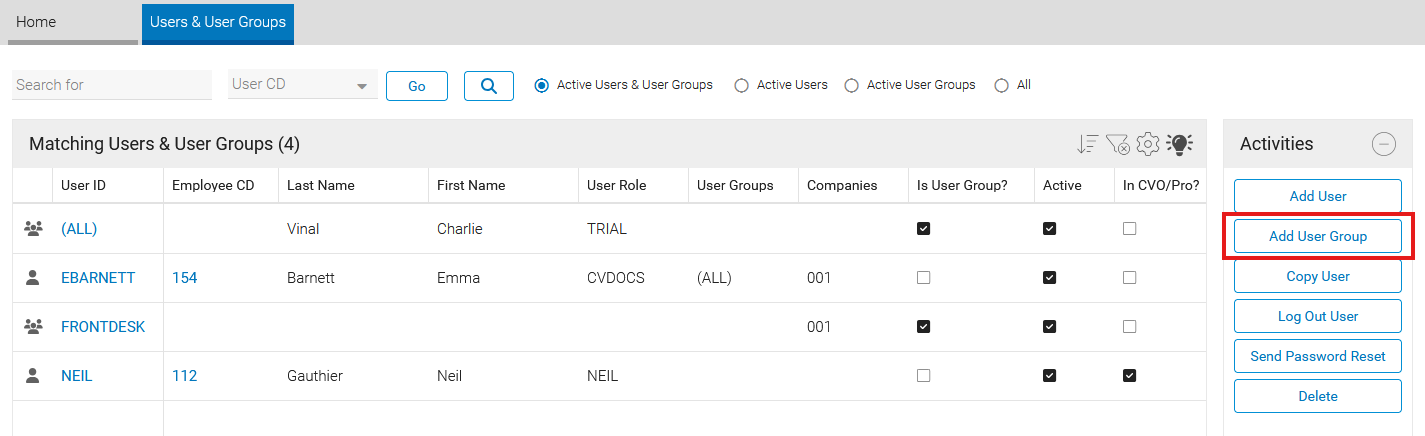
Click the "Add User Group" button from the "Activity Panel" on the right-hand side of the users list. This will open a blank user group notebook.
-
Complete the following information in the "User Info" section.
-
User Group ID: Sets the group name. The ID cannot include spaces. This is a required field.
-
Companies: Select the companies that the user should be able to see data for.
-
-
Click "Save" on the bottom right-hand corner of the user notebook to create the user group.
To assign a user to a user group, it can be done from the user group notebook or the user notebook.
To assign a user to a user group from the user group notebook:
-
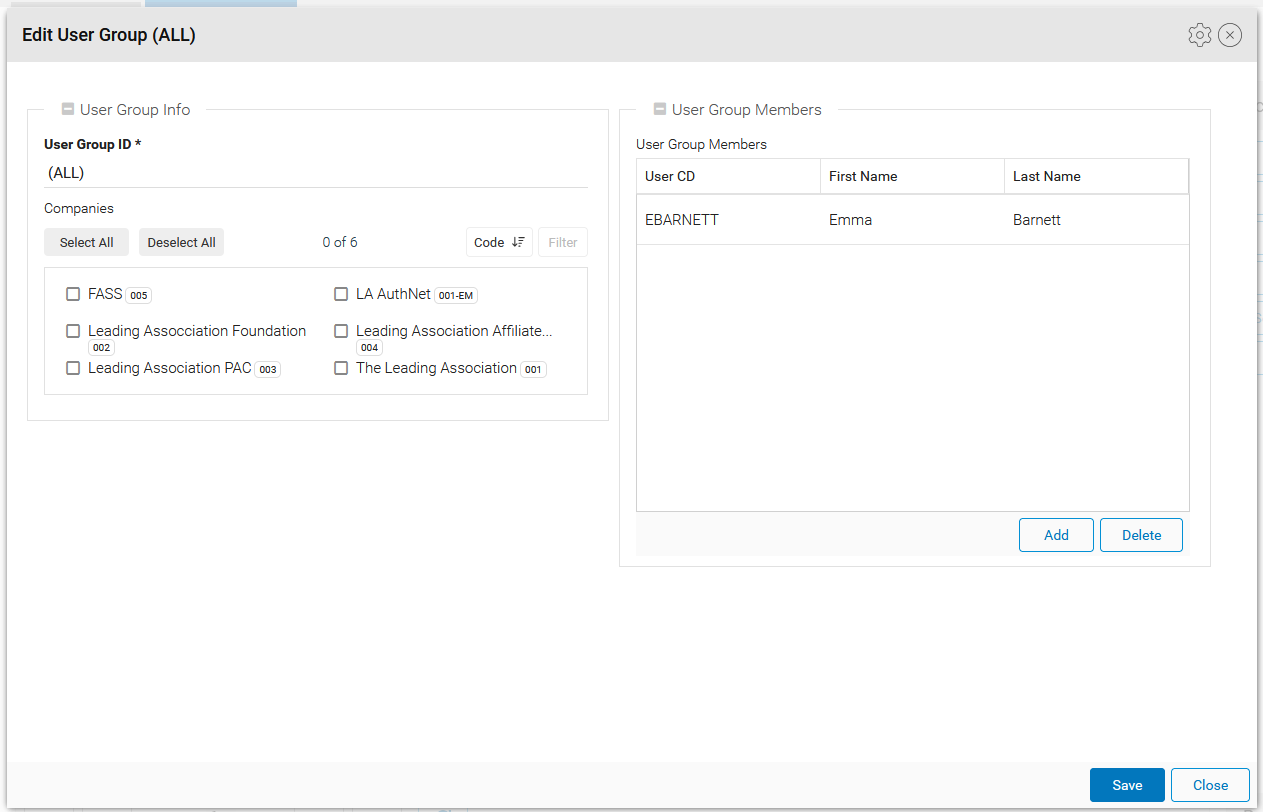
Click the link in the "User ID" column of the user group record. This opens the user group notebook.
-
Click the "Add" button at the bottom of the "User Group Members" section.
-
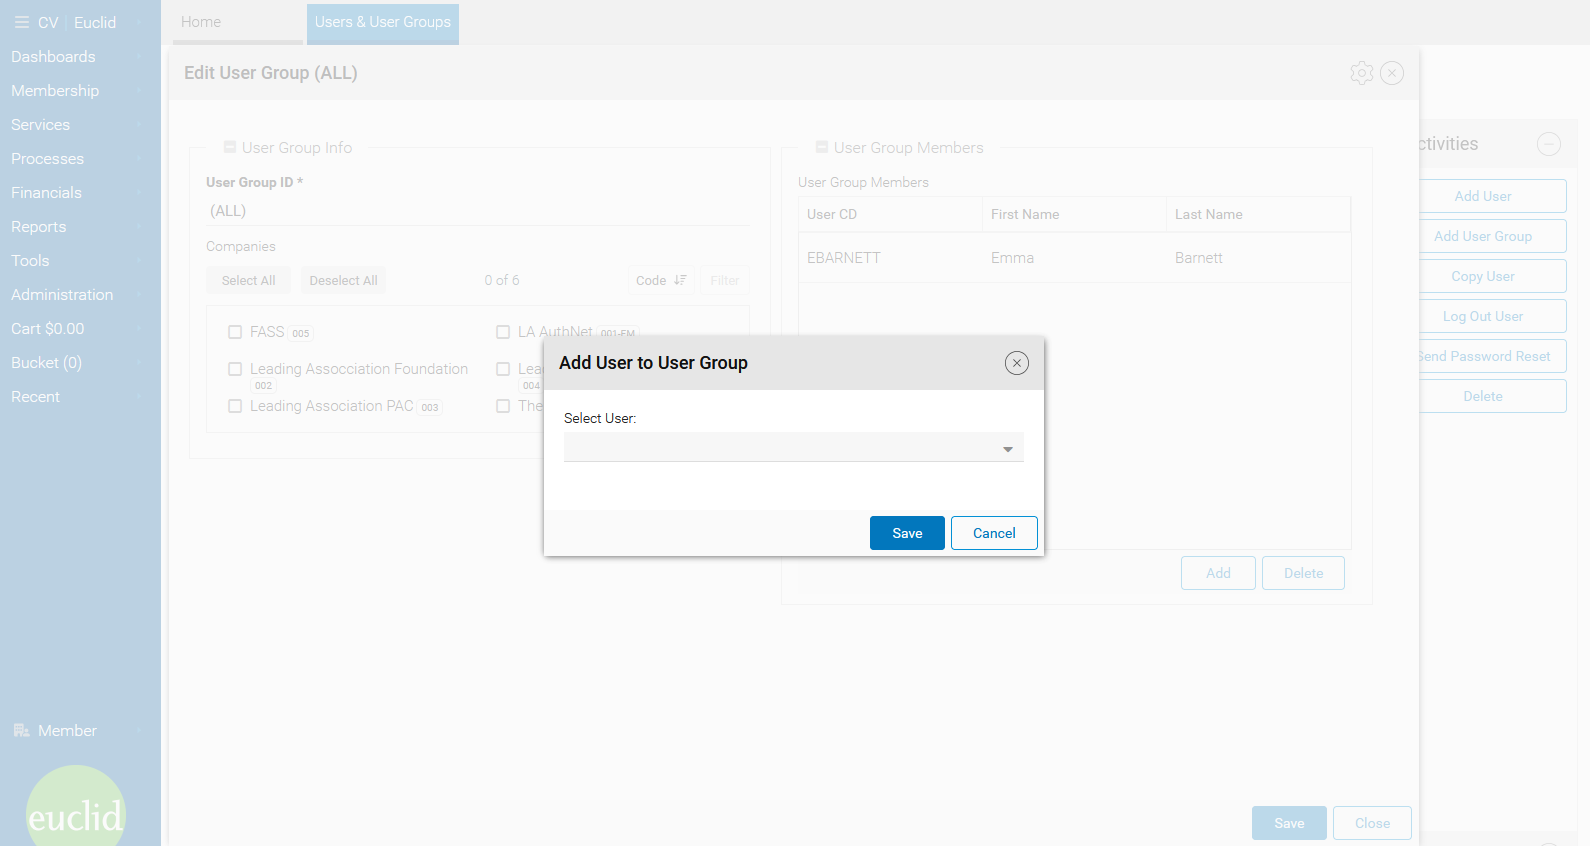
Select the user from the "Select User" dropdown field and click "Save" to add the user to the user group.
To remove a user from a user group, click the user to be removed and click the "Remove" button at the bottom of the "User Group Members" section.
To assign a user to a user group from the user notebook:
-
Click the link in the "User ID" column of the user record. This opens the user notebook.
-
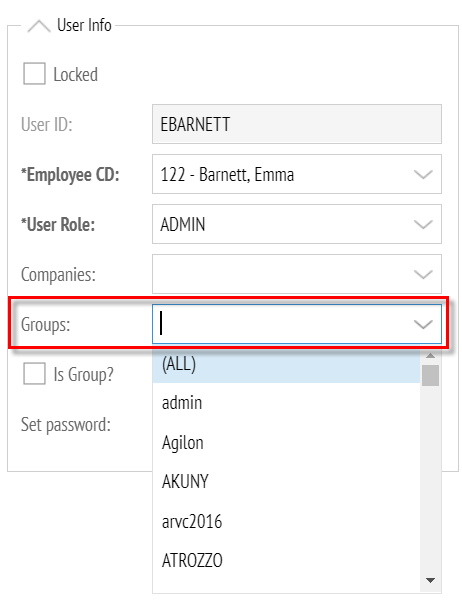
Click the "User Groups" dropdown field and select the user groups that the user should be part of.
-
Click the "Save" button on the user record.
To remove a user from a user group, click the "User Groups" dropdown field and uncheck the user group(s) that the user should no longer be part of. Click "Save" to save the changes.
Changing User Password
Manual Password Reset
Users can change their own passwords as outlined in the Basics guide. When users forget their passwords, a system administrator can also reset them.
Note
There is no way to recover a ClearVantage user's existing password.
-
From the main menu, click "Admin" and select "Edit Users & User Groups".
-
Click the link in the "User ID" column of the user record to edit. This opens the user notebook.
-
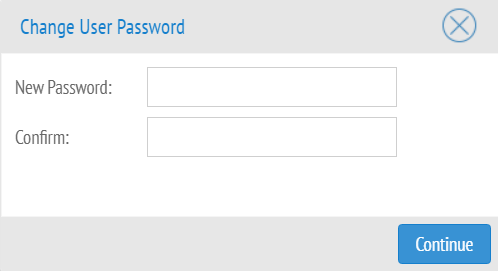
Click "Change User Password" button.
-
Enter a new password that is at least 12 characters in length and contains upper and lower-case letters, at least one number and at least one special character.
-
Confirm the new password.
-
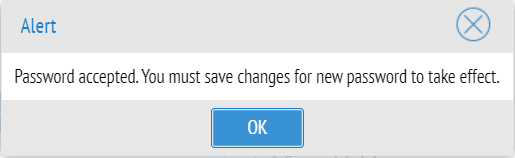
Click "Continue" to save the password. An alert opens to remind you to save on the user record as well for the new password to take effect.
-
Click "OK".
-
Ensure the "Locked" permission check box is unchecked.
-
Click "Save" at the bottom right-hand corner of the user notebook to save changes.
Send Password Reset
A system administrator can send a password reset link to users who have forgotten their password. The user must have an email address on their employee record to receive the reset email.
-
From the main menu, click "Admin" and select "Edit Users & User Groups".
-
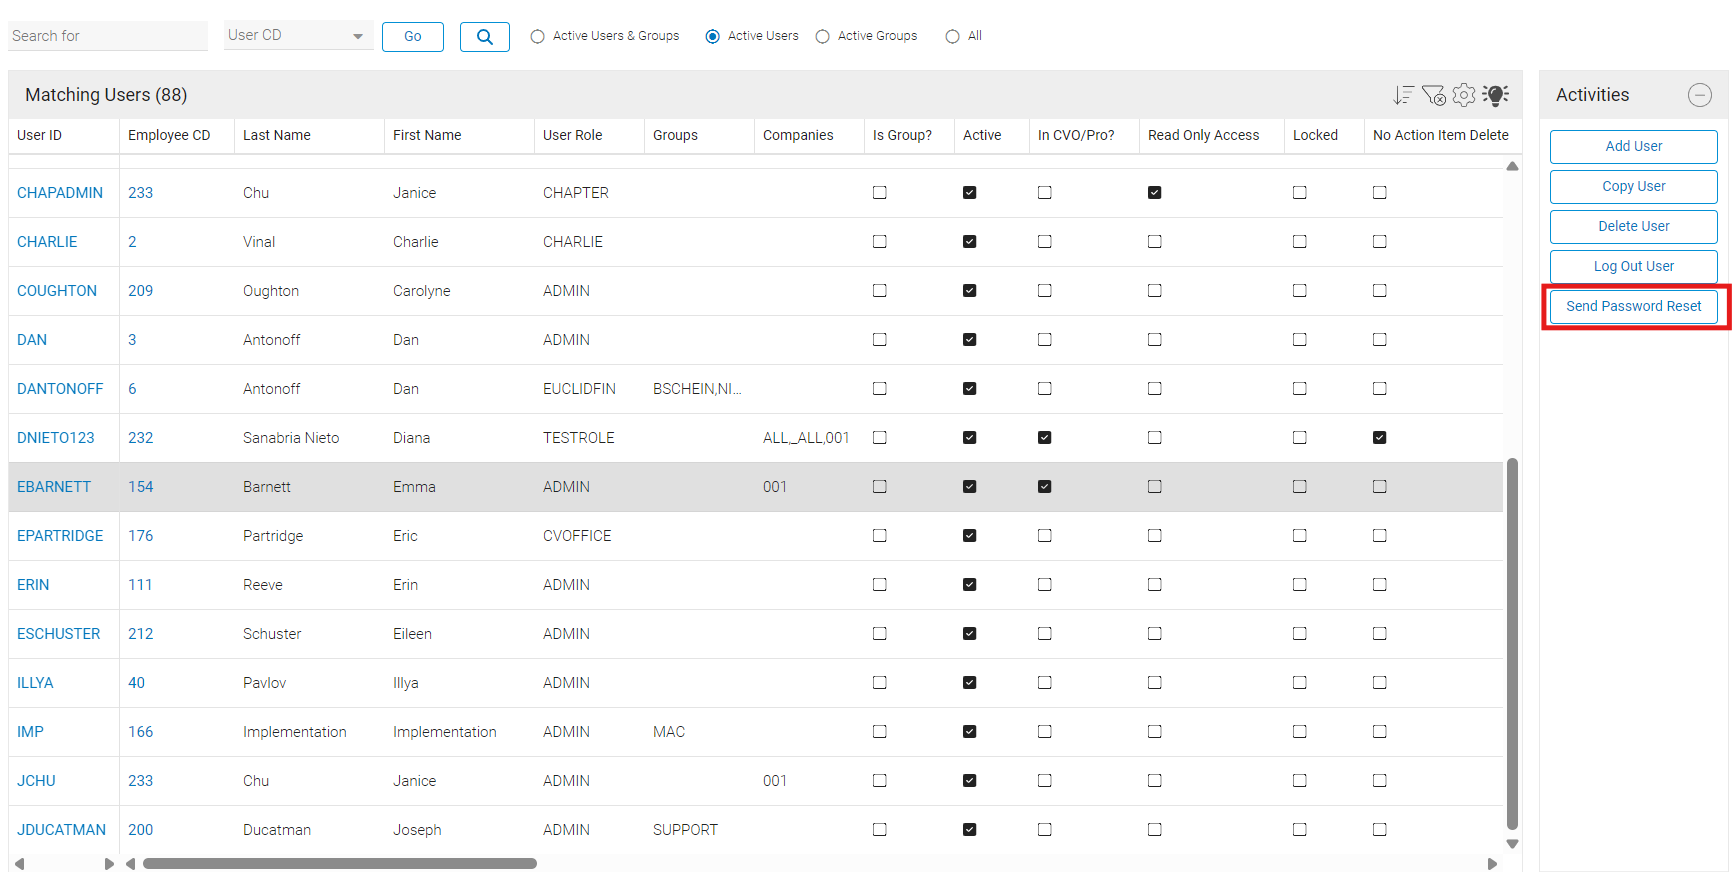
Click anywhere in the user's row (not a hyperlink) to select the row of the user you want to send a password reset link to.
-
Click "Send Password Reset" in the Activity Panel to email the user a password reset link.
View List of Users Logged into CV Online/CVPro
System Administrators can view which users have an active ClearVantage session.
To view a list of CV users:
-
From the main menu, click "Admin" and select "Edit Users & User Groups".
-
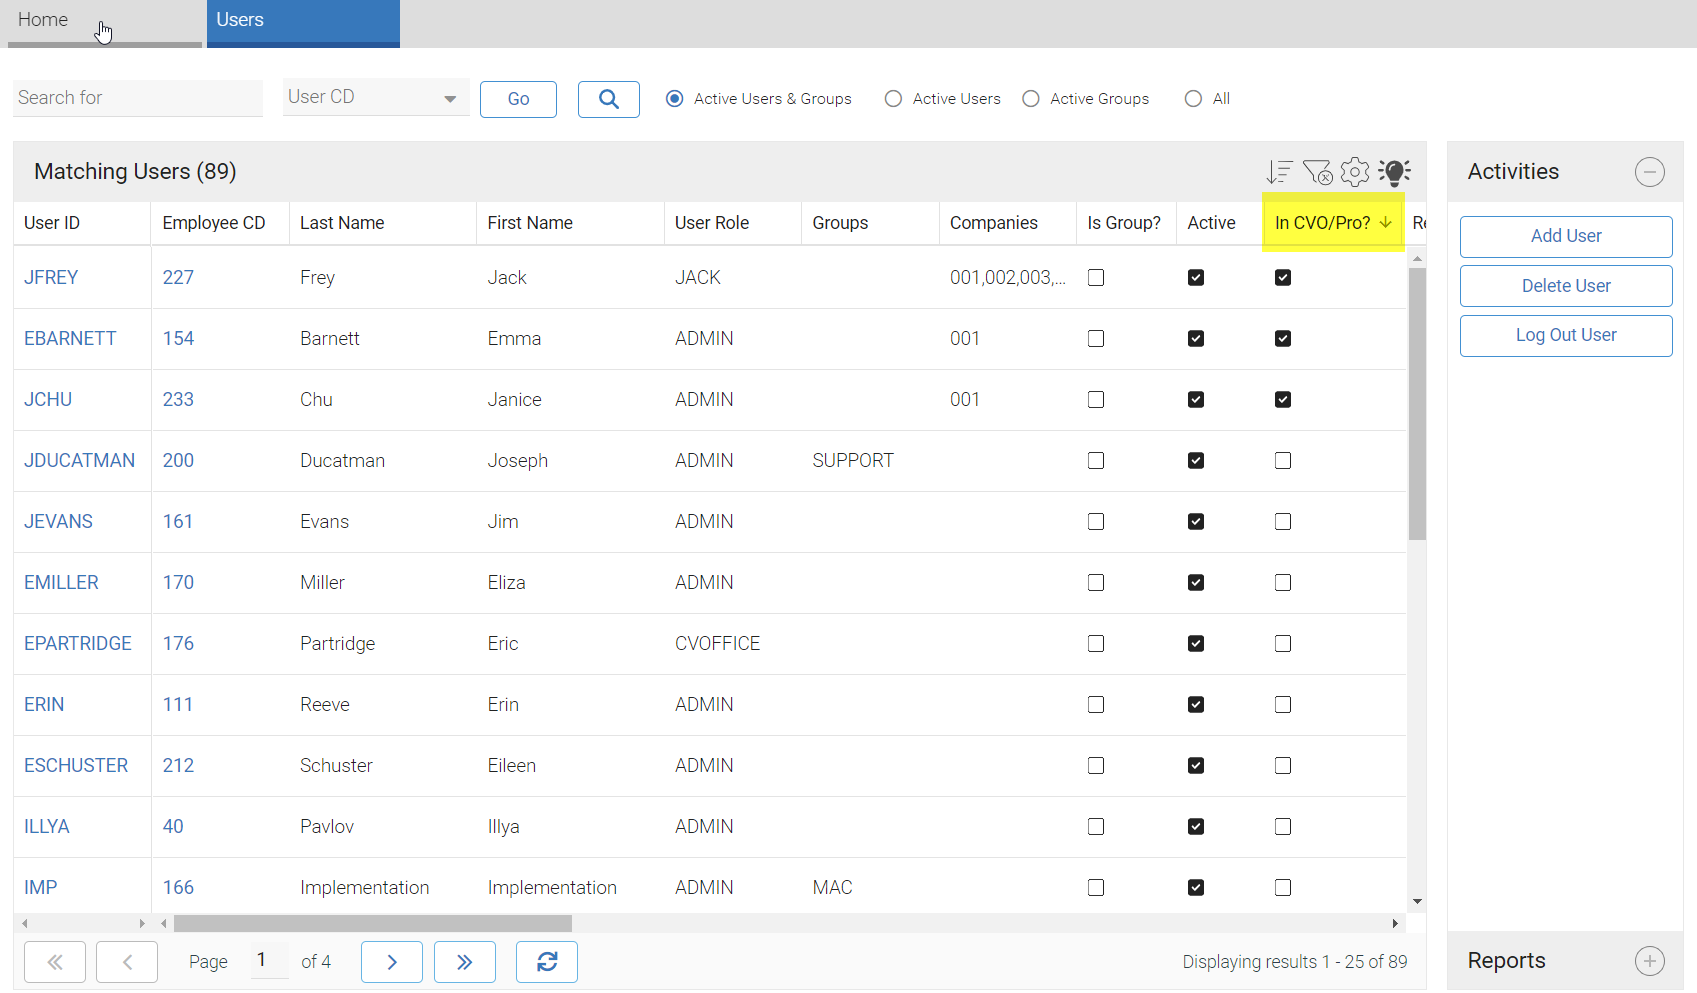
The "In CV Online/Pro" column will be checked if the user is currently logged into CV Online/CVPro.
Log Out ClearVantage Users
System Administrators can log out other CV users.
To log out user:
-
From the main menu, click "Admin" and select "Edit Users & User Groups".
-
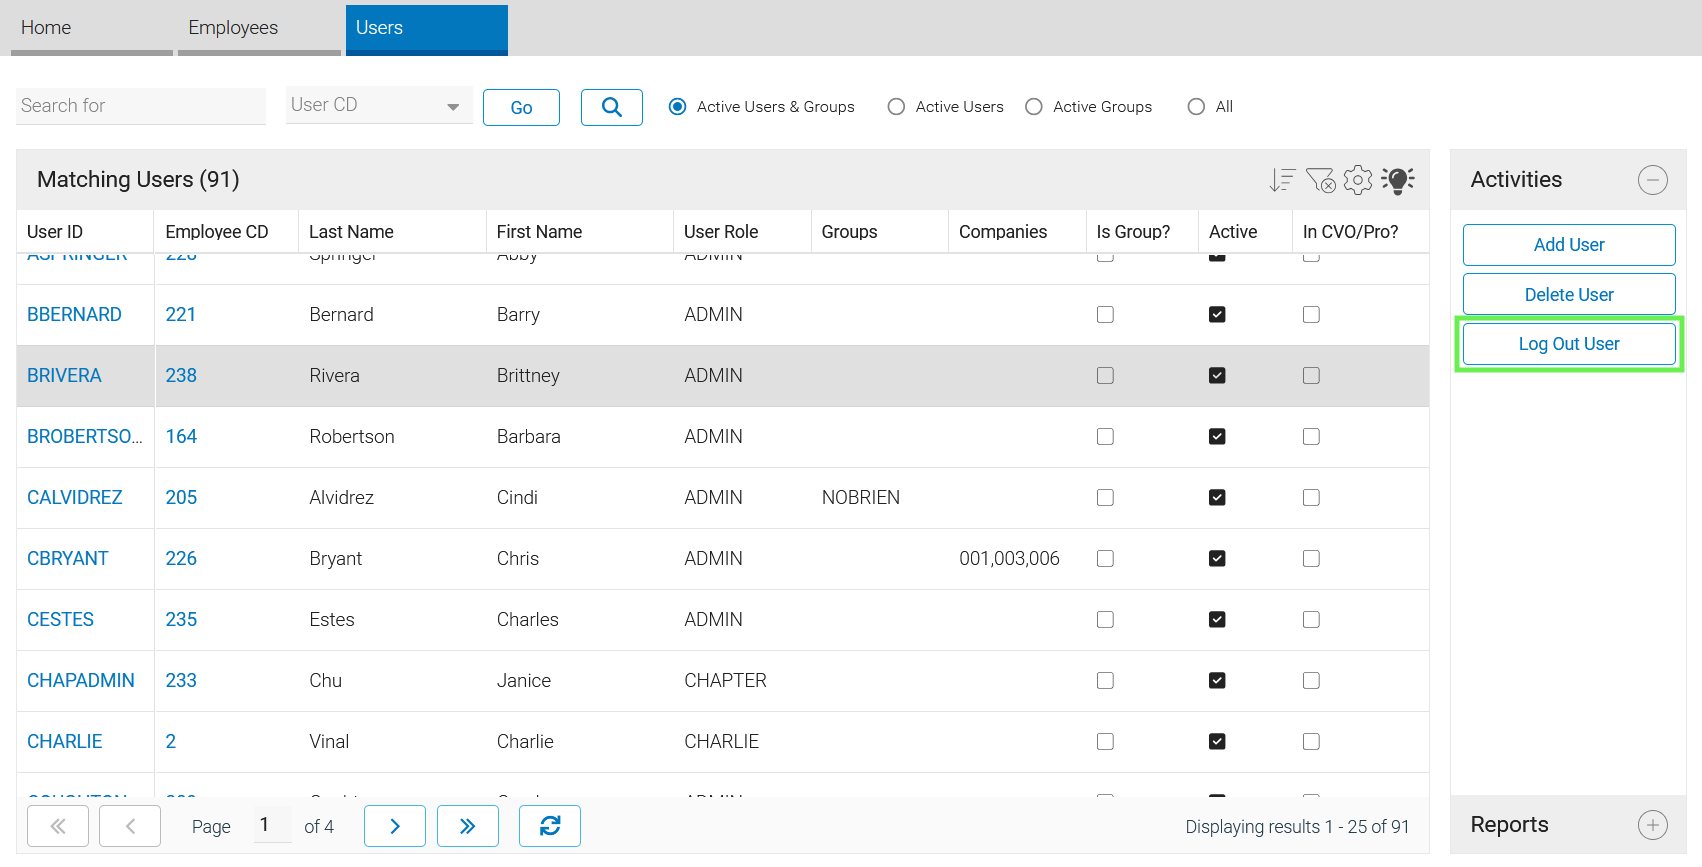
Click the row of the user you wish to log out to highlight the row gray.
-
Click the "Log Out User" button from the "Activity Panel" on the right-hand side.
-
This will automatically log the user out and you will get a pop-up window on the top right-hand corner of the screen stating the user has been logged out.
Unlocking User Logins
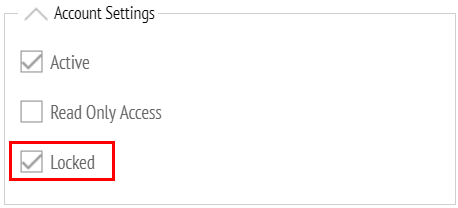
A user account is locked if an incorrect password is entered 3 times. The account is locked for 30 minutes or until an administrator unlocks the account. To unlock the account:
-
From the main menu, click "Admin" and select "Edit Users & User Groups".
-
Click the link in the "User ID" column of the user record to unlock. This opens the user notebook.
-
Under the "Account Settings" section, uncheck the "Locked" checkbox.
-
If you wish to reset the password, you can now follow the instructions for changing a user password.
-
Click the "Save" button. The user may now log into ClearVantage.
Note
If a user account is locked, the account is unlocked automatically after 30 minutes. If the user attempts to log into CV prior to the 30 minutes having elapsed, the counter is reset, and the user needs to wait another 30 minutes.
Deactivating a ClearVantage User
Deleting a ClearVantage user removes the link between the user and the employee record. This can cause later problems for reporting and auditing. For example, confusion as to which employee updated a record can be caused if a username is reused or deleted.
Warning
It is recommended that you mark users as inactive rather than deleting them.
To mark a user as inactive:
-
From the main menu, click "Admin" and select "Edit Users & User Groups".
-
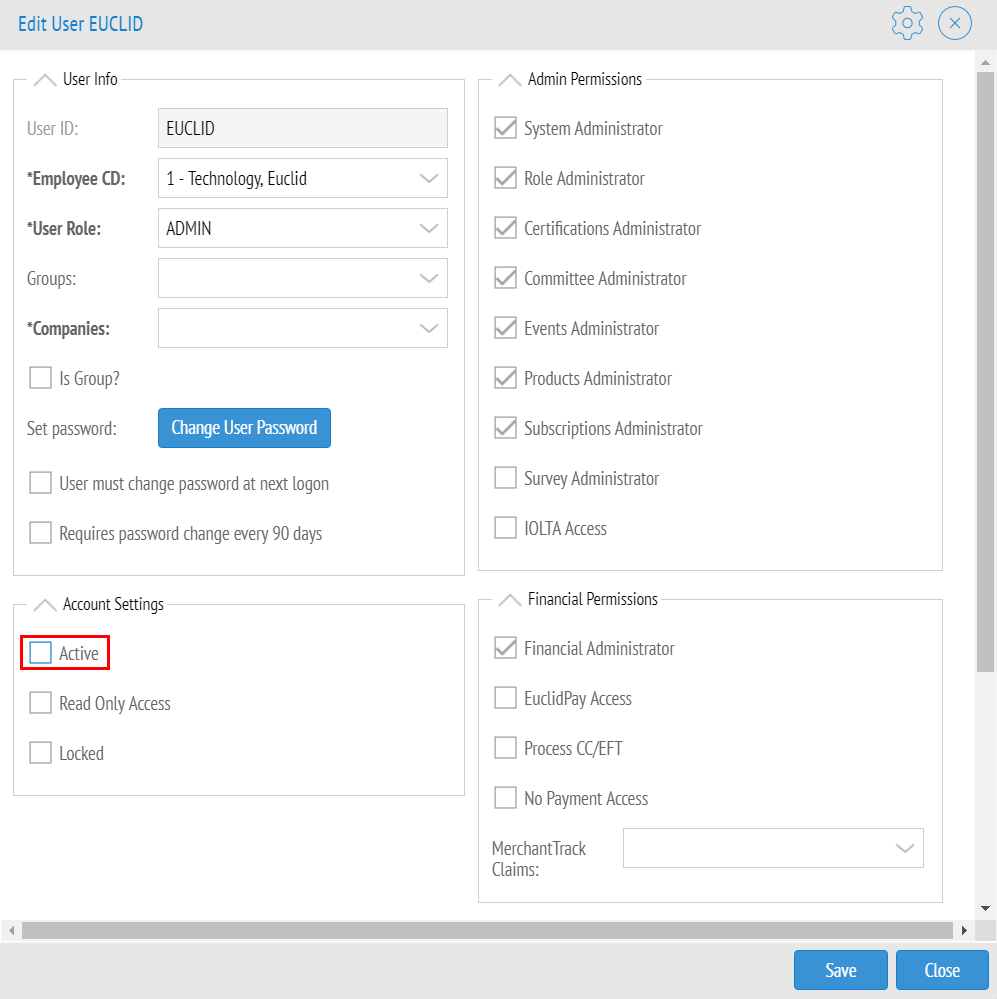
Click the link in the "User ID" column of the user record to deactivate. This opens the user notebook.
-
Uncheck the "Active" flag in the "Account Settings" section.
-
Click the "Save" button.
The user cannot login to ClearVantage, and no longer count against any restriction of active user licenses.
User Roles
Customizing User Roles
ClearVantage offers the flexibility to customize the layout of various parts of the software by assigning roles to groups of users. Roles serve three main purposes:
-
Security: ClearVantage roles allow administrators to secure or hide information that only certain staff members should see. For example, financial information is often limited to a specific group of individuals.
-
Ease of use: Notebooks can be customized for specific roles to maximize accessibility of fields within the Notebooks.
-
Relevance: To eliminate clutter within notebooks. Roles allow users to hide irrelevant information. The information that is most important for a particular staff member can be shown.
Basic roles have been created during the ClearVantage implementation, but system administrators and role administrators are encouraged to adapt and manage roles as needs arise.
Add Roles
Roles let you define a reusable user profile and assign multiple people to it. This makes it easy to give entire departments or workgroups the same access and workspace. After creating a new role, you'll still need to customize it by configuring the role's fields, buttons, layout, and permissions.
-
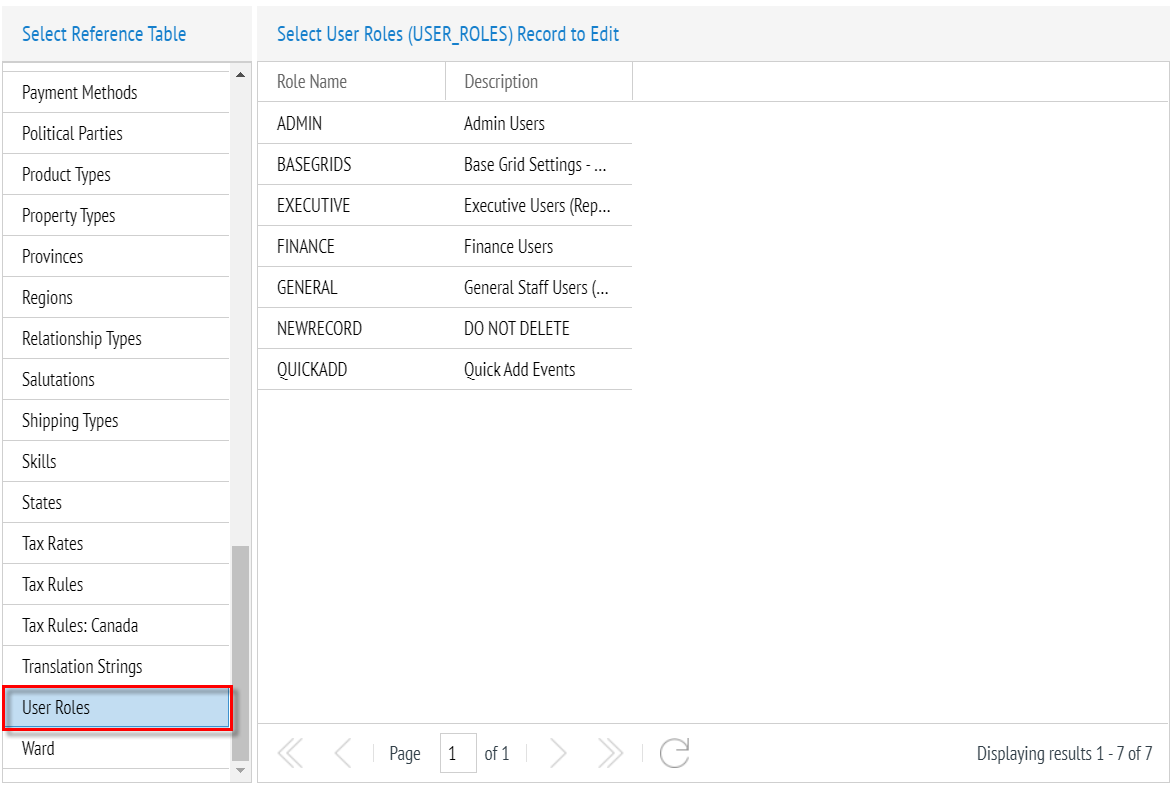
From the main menu, click "Admin" and select "Edit Reference Tables".
-
In the reference tables list, scroll down and click the "User Roles" reference table.
Note
After editing reference tables, you will need to reload CV before you see your changes reflected.
-
Click the "Add Record" button on the top right-hand corner of the screen.
-
Enter a "Role Name" and "Description". Role names cannot include spaces.

-
Click "Save".
You should log out of ClearVantage, then log back in, before trying to make any additional changes to the new role.
Duplicate Role
If you would like to create a new role that is like an existing role, you can duplicate the existing role and then make changes to the new role.
-
From the main menu, click "Admin" and select "Edit Reference Tables".
-
In the reference tables list, scroll down and click the "User Roles" reference table.
-
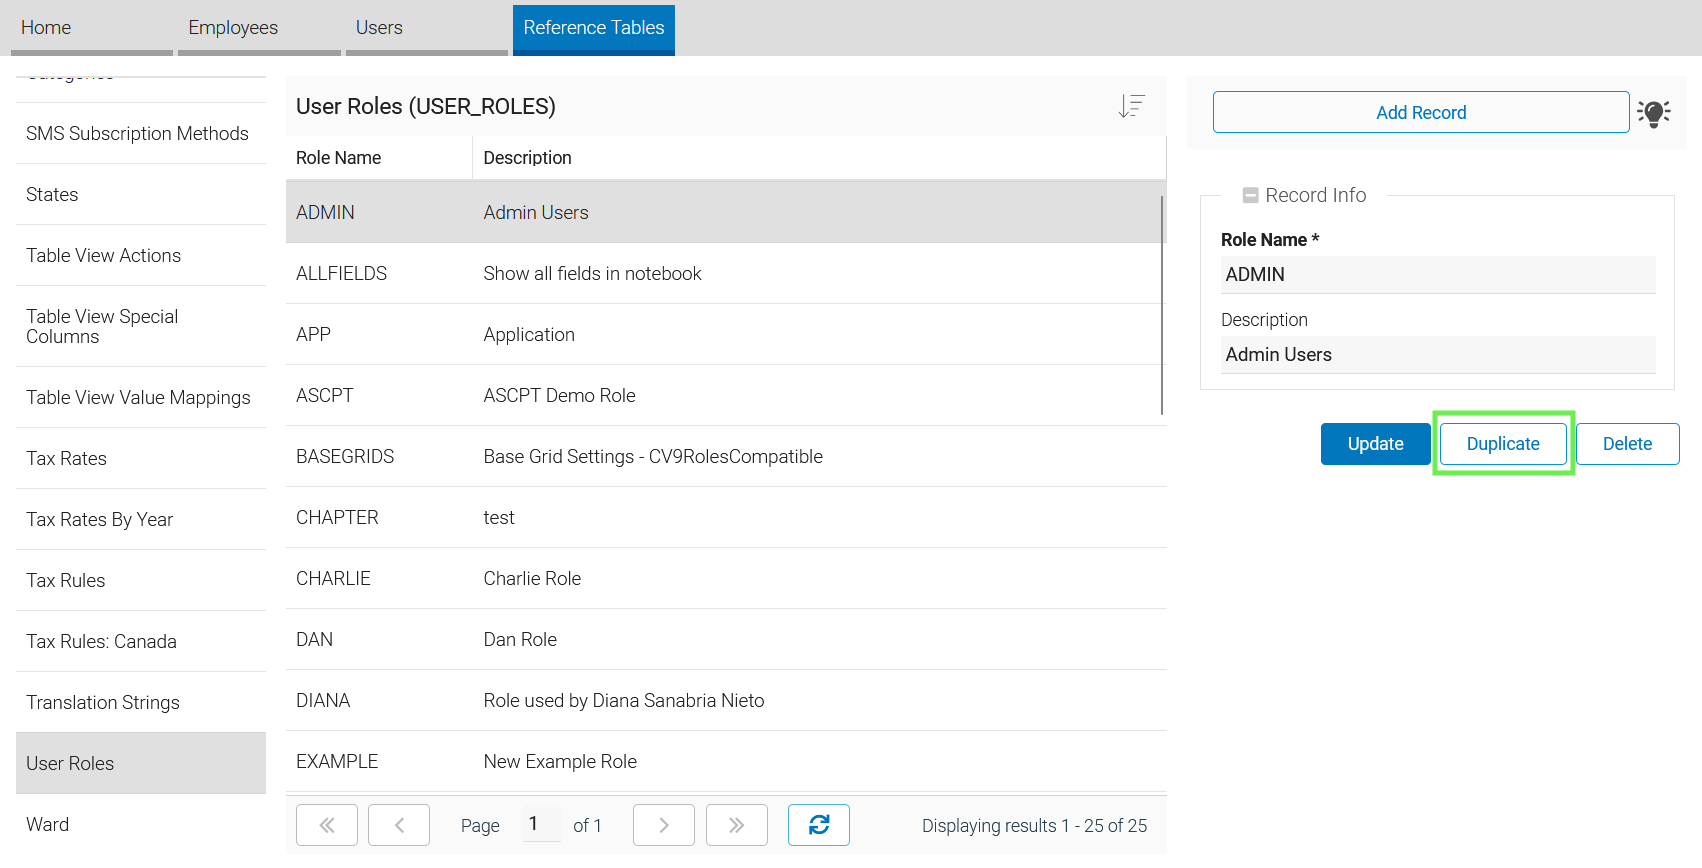
Select the role which will be duplicated. The right side of the page will show a form with the role information.
-
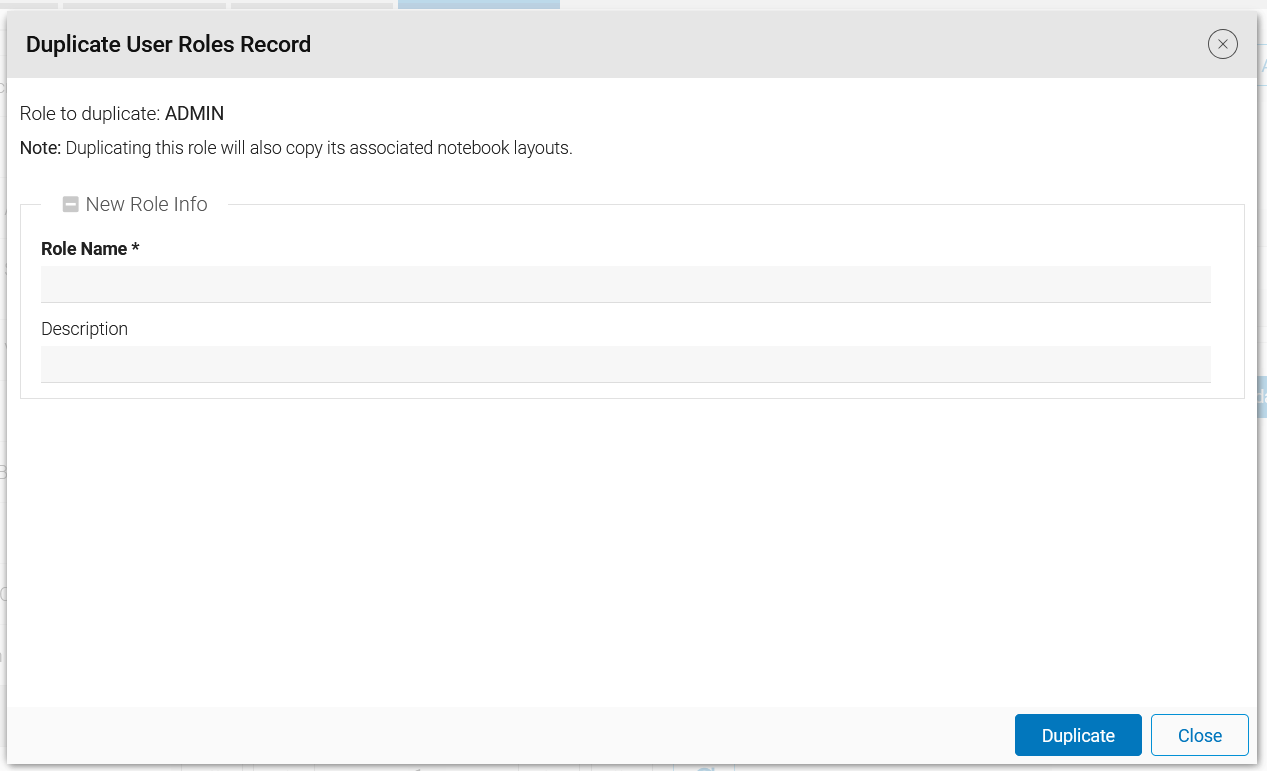
Click the "Duplicate" button to duplicate the selected role. A new window will show.
-
Enter the name of the new role and a description.
-
Click the "Duplicate" button at the bottom of the window.
Assign Users to New Roles
Users must be assigned to a role when the user record is created. You can use the following instructions to assign a user to a different role.
-
From the main menu, click "Admin" and select "Edit Users & User Groups".
-
Click the link in the "User ID" column of the user record to edit. This opens the user notebook.
-
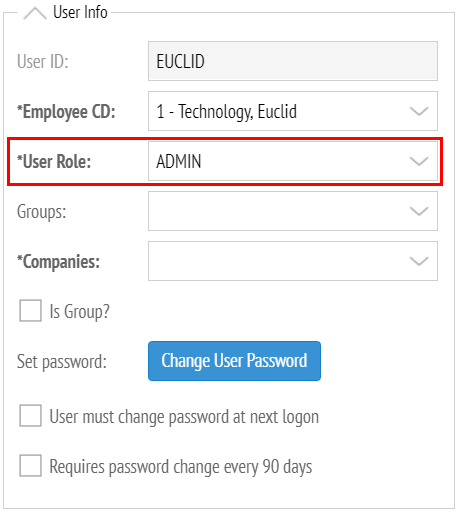
In the "User Info" section, click the "User Role" dropdown and select the new role.
-
Click the "Save" button to save the changes to the user record.
Employee Management
Add Employees
While employees are typically created when adding a user (via the "Link Employee" button), standalone employee records can also be created for staff members who do not need ClearVantage access.
-
From the main menu, click "Admin" and select "Edit Employees".
-
Click "Add Employee" from the "Activity Panel" on the right-hand side of the employee list. This opens an empty employee notebook.
-
Fill in the appropriate employee information. The first and last name should be entered at a minimum.
-
Click the "Add Record" button at the bottom right-hand corner to create the new employee.
Edit an Employee
Once created, an employee record may need updating (name changes, etc.). If you want to change the name that appears in new timestamps for a staff member without changing their login, you should update the name in the employee notebook.
-
From the main menu, click "Admin" and select "Edit Employees".
-
Click the link in the "Employee ID" column of the employee record to edit. This opens their employee notebook.
-
Click the "Save" button at the bottom right-hand corner.
2FA Preferences
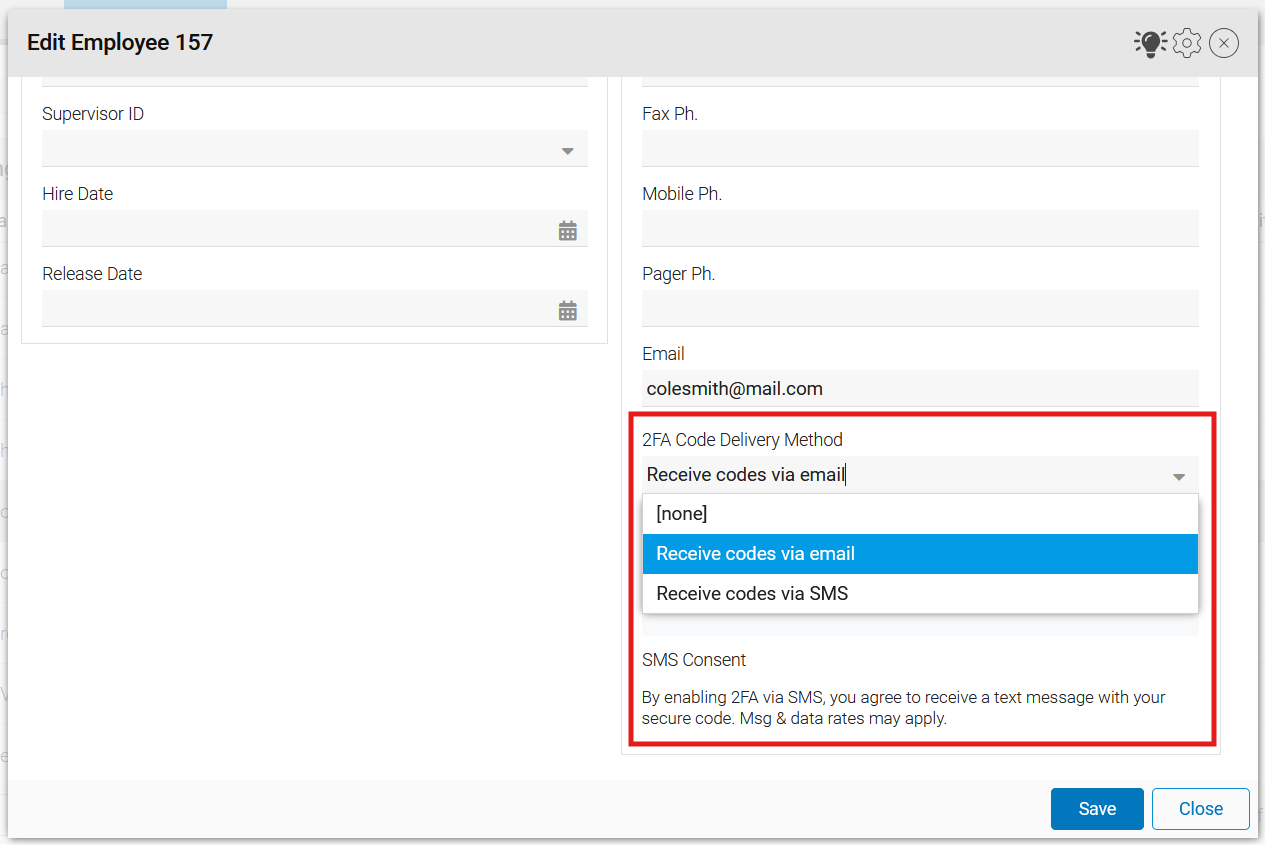
By default, two-factor authentication (2FA) codes are sent to the user's email address that is in their associated employee record. A user's 2FA preference can be updated to allow the user to receive 2FA codes via SMS that will be sent to the mobile phone number in their associated employee record.
Note
The "2FA Preferences" field might not be present in the employee notebook. If this is the case, please edit the employee notebook layout and add the "2FA Preferences" field to the notebook. For more on how to edit notebooks, see the Notebook Editor.
To update an employee's 2FA preferences:
-
Select the preferred 2FA code delivery method (email or SMS).
-
Update the email address or phone number as needed.
-
Click "Save" to apply the changes.