Creating Dashboard Gadgets
CVPro
This guide is only applicable to enterprise clients using CVPro or CV9.
System administrators can add gadgets. This can be done by downloading gadgets from the ClearVantage Marketplace or creating new gadgets in the Shared List Manager. These features are only available for clients using ClearVantage Pro.
ClearVantage Marketplace
The Marketplace option under Pro Tools allows you to filter through categories such as "Membership" to view available gadgets to download to your database. Gadgets are provided as-is and may not suit client-specific configurations.
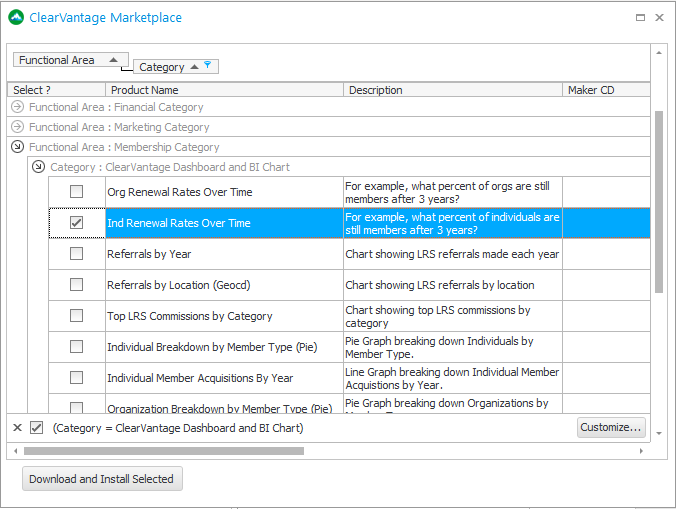
To add gadget(s) to your database,
-
Check the left-most "Select?" box
-
Click the "Download and Install Selected" button at bottom-left
You will receive a message confirming the gadget(s) were added to your database. The gadget(s) will be subscribed for your user; if others should have access, navigate to Shared List Manager as described in the next section. For more information, see the Marketplace guide.
Shared List Manager
The Shared List Manager is the repository of all dashboard gadgets. It is also the repository of all saved lists (e.g., Individual saved lists). Use the Shared List Manager to edit gadgets, such as changing their title or description, or to delete unnecessary gadgets.
See the Shared List Manager user guide for more about the Shared List Manager.
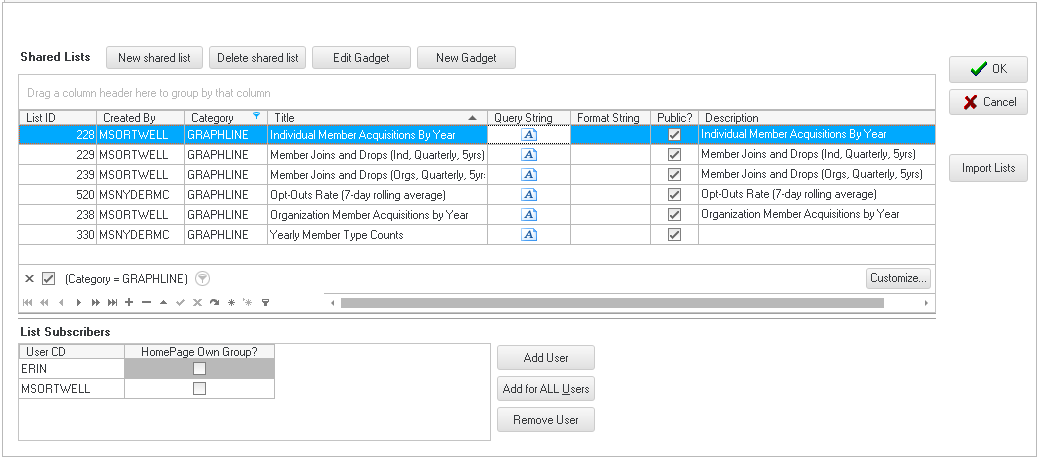
Change Gadget Subscribers or set Public
Use the List Subscribers at bottom-left to change who is subscribed to each saved list or gadget.
-
"Add User" will add a new row to the subscriber list, this will be a dropdown allowing you to select a user.
-
"Add for ALL Users" will add "(ALL)" as a list subscriber – this subscribes all active users in the database.
-
"Remove User" will remove the user you have selected in the List Subscribers window.
Subscribed users will see their subscribed gadgets in the selection dropdown on their home screen. For example, if user ERIN is subscribed to a Snapshot Line Chart "Individual Member Acquisitions by Year," she will see that chart as an option in the selection dropdown for her Snapshot gadget.
An alternative to subscribing users is to make the gadget public, by checking the "Public" box in the Shared List Manager. The gadget will not appear in their selection dropdown, but all users will have the option to subscribe to it (thus causing it to appear in their dropdown).
Step-by-Step Custom Gadget Examples
This section provides examples of creating custom gadgets in the Shared List Manager. As a general rule, the process is:
-
Click "New Gadget" button at top
-
This opens the Gadget Builder; in this screen,
-
Select a Gadget Type
-
Enter a Gadget Title
-
Enter a SQL Query or use Build Query to create your query; the Build Query interface provides a query builder similar to the standard report writer
-
Use Save Gadget to save and close the gadget
-
-
Add list subscribers or set the gadget to public
Pie Chart
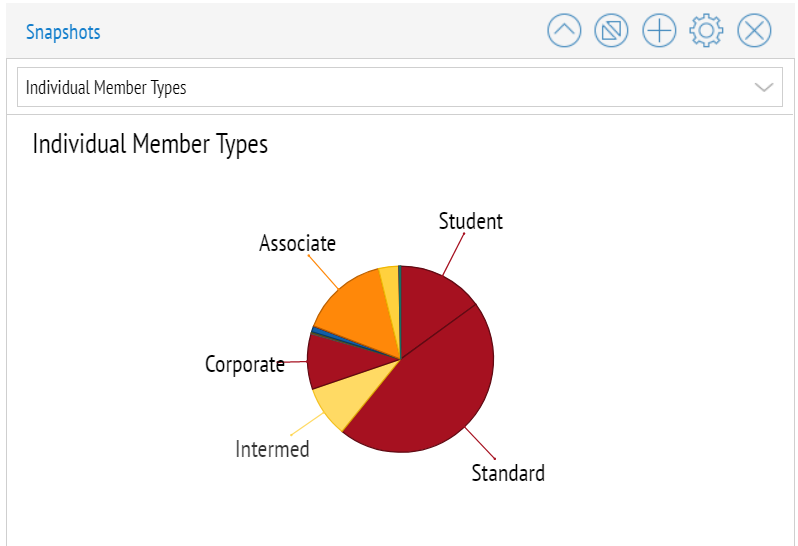
This section describes how to create a Pie Chart of individual members, broken down by Member Type.
First, open the Gadget Builder by clicking "New Gadget." Select a Gadget Type and enter a Title.

Use the "Build Query" button to open the standard report writer query builder. For a pie chart of members by type, add the CUSTOMER table, and then add the following fields with settings as follows:
-
ISMEMBERFLG: set the Show property = Hide, Filter = "Y"
-
CUSTOMERTYPE: set the Show property = Group
-
CUSTOMERCD: set the Show property = Count
Click the Preview tab to see the query results. When you are done building the query, choose File > Close. This will save the built query into your gadget.
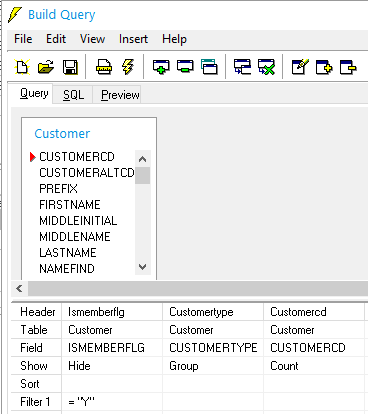
After finishing the query, click Save Gadget to save and close your gadget. The final step is to edit the List Subscribers or set the gadget to be publicly available.
Line Chart
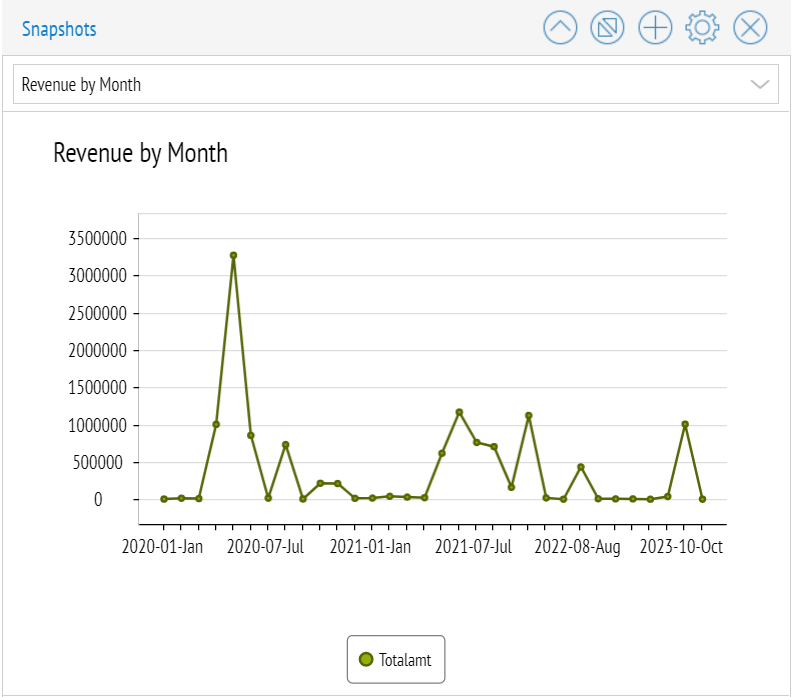
This section describes how to create a Line Chart of revenue by month.
First, open the Gadget Builder by clicking "New Gadget." Select a Gadget Type and enter a Title.

Use the "Build Query" button to open the standard report writer query builder. For a line of chart of revenue by month, add the INVOICE table, and then add the following fields with settings as follows:
-
BILLPERIOD: set the Show property = Group, Filter >= 2020-01-Jan, Sort = Ascending
-
TOTALAMT: set the Show property = Sum
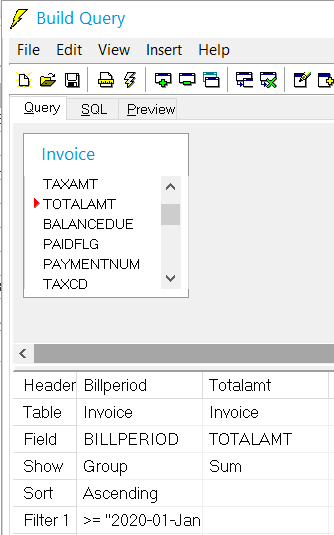
Click the Preview tab to see the query results. When you are done building the query, choose File > Close. This will save the built query into your gadget.
After finishing the query, click Save Gadget to save and close your gadget. The final step is to edit the List Subscribers or set the gadget to be publicly available.
Pivot View
This section describes how to create a Pivot View to analyze individual membership.
First, open the Gadget Builder by clicking "New Gadget." Select a Gadget Type and enter a Title.

Use the "Build Query" button to open the standard report writer query builder. For a pie chart of members by type, add the CUSTOMER table, and then add the following fields with settings as follows:
-
ISMEMBERFLG: set the Show property = Hide, Filter = "Y"
-
CUSTOMERTYPE: set the Show property = Group
-
STATUSSTT: set the Show property = Group
-
CHAPTERID: set the Show property = Group
-
TERMINATIONDATE: set the Show property = Group
-
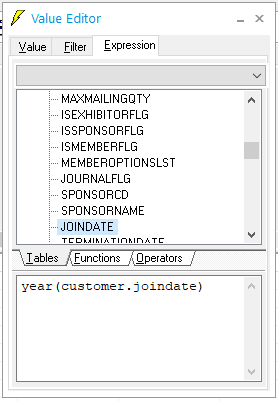
Custom column (as shown in screenshot at left)
-
Double-click in an empty column to create a custom column, the properties window will open on the Expression on tab
-
Enter
year(customer.joindate)in the Expression tab -
Navigate to the Value tab
-
Set the Show Property = Group
-
Set the Header Property = "JoinYear"
-
-
CUSTOMERCD: set the Show property = Count
The end result of this query is to produce a count of members for each unique combination of CUSTOMERTYPE, STATUSSTT, CHAPTERID, TERMINATIONDATE, and JoinYear. This provides the necessary data to support summary and drilldown analysis via a pivot view.
See screenshot on next page for query example.
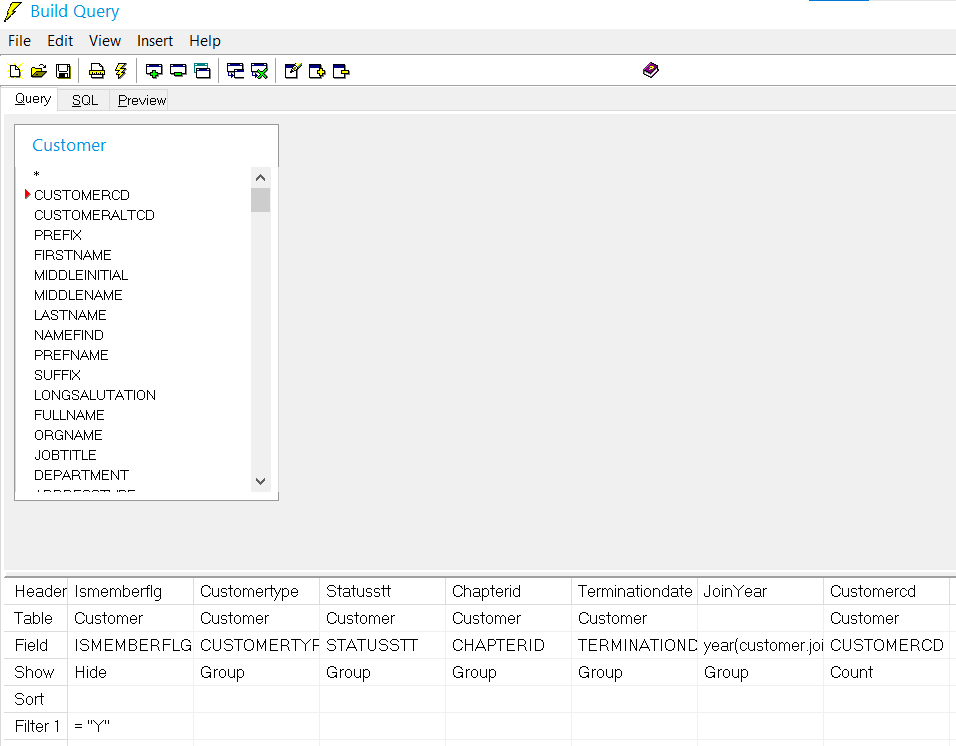
Click the Preview tab to see the query results. When you are done building the query, choose File > Close. This will save the built query into your gadget.
To finish setting up your pivot view,
-
Click the Data Preview tab in your gadget builder.
-
At bottom of the gadget builder, note the area labeled "Fields Available"
-
Drag JoinYear into the Column Fields section
-
Drag CUSTOMERTYPE into the Row Fields section
-
Drag CHAPTERID into the Row Fields section
-
Drag Customercd into the Data Fields section
These steps produce a data query with field selections that result in a Pivot View displaying a column for each JoinYear, a row for each Customer Type, and within Customer Type, rows for each Chapter. See screenshot on next page. The following screenshot shows the completed gadget setup, and on the following pages you can see the resulting displayed gadget.
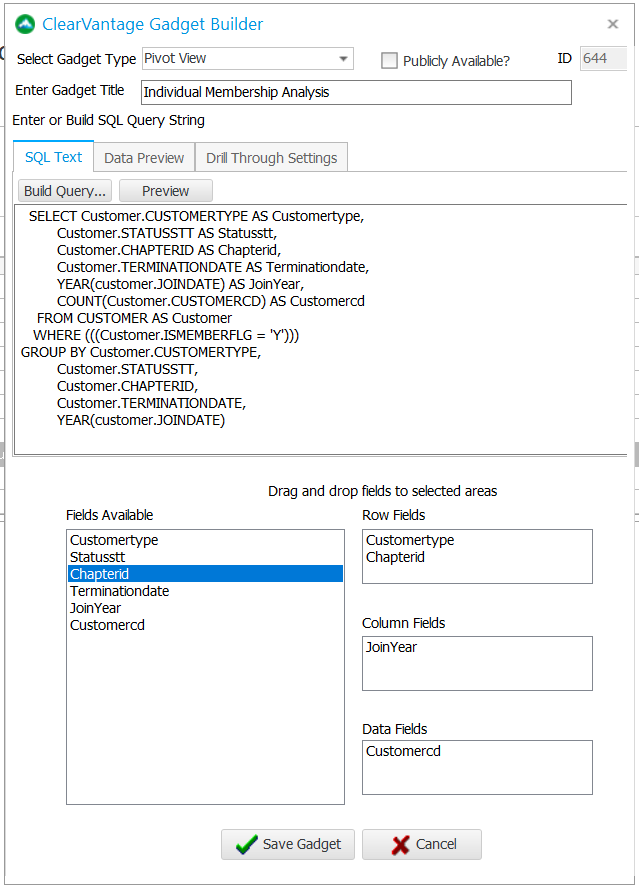
After finishing the query, click Save Gadget to save and close your gadget. The final step is to edit the List Subscribers or set the gadget to be publicly available.
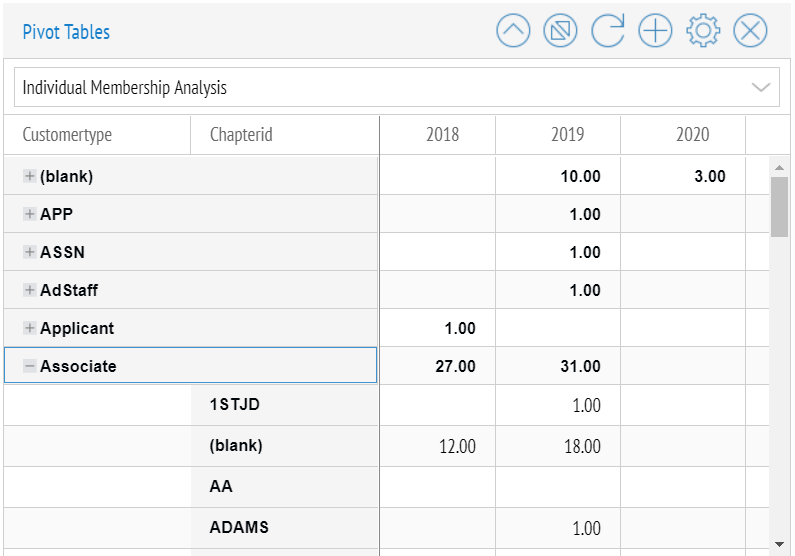
On the dashboard, you can now see your Pivot View, with years across the top, and member types down the left side. Each member type is expandable to see the chapters participated in by members of that type. The grid shows member counts.
For example, in the screenshot below, there are 31 Associate members who joined in 2019, of which 1 are in the 1STJD chapter, 18 do not have a chapter, and so on.
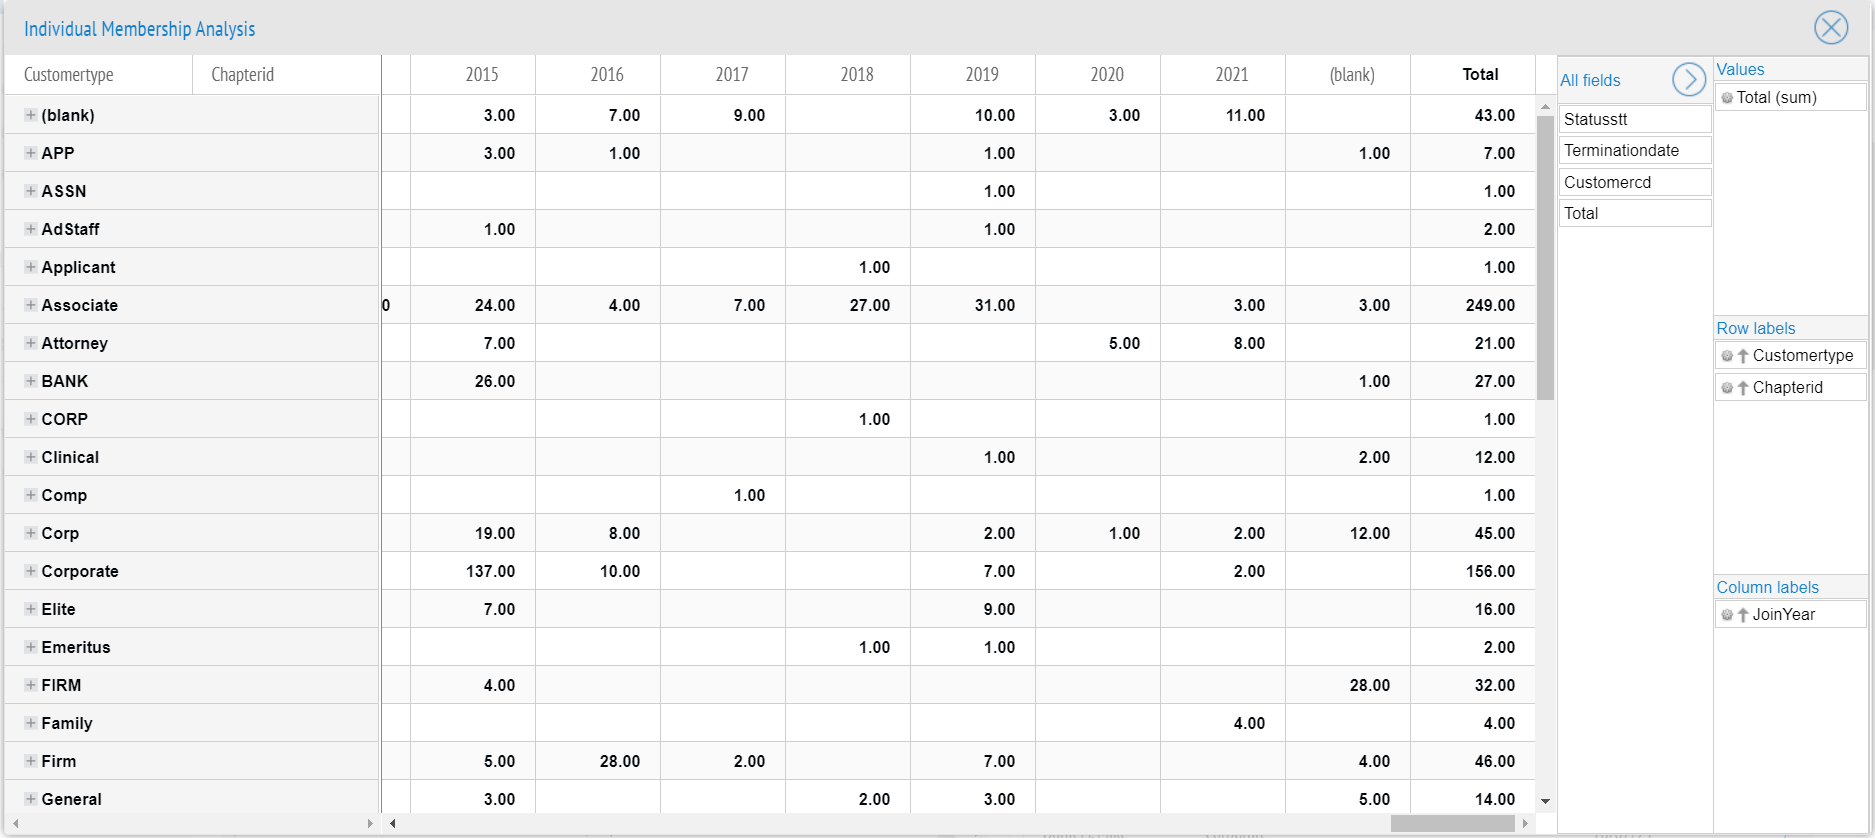
Finally, recall that you can use the Expanded View to get additional Pivot View features. As shown in the screenshot below, the Expanded View provides a larger view to see more data at once, as well as the ability to do ad hoc pivot analysis by dragging-and-dropping fields into different combinations of Row and Column fields.
Additional Resources
When working with dashboards and building gadgets, the following resources may be helpful.
-
Shared List Manager User Guide provides step-by-step instructions for opening and creating basic dashboards.
-
Report Writer User Guide provides instructions for building standard reports, which use the same query builder interface as the gadget builder.
-
Field Mapping User Guide provides standard mappings from the visual notebooks in the system to the data tables and fields accessible in the query builder.