Submissions
The Submissions module provides a way to create and manage customizable submission forms. Through this feature, collect information from members via surveys, request document uploads, and require payments as part of the submission process. To access the Submissions module from the main menu, click "Membership" and select "Submissions".
Note
If the "Submissions" option is not available in the main menu, it can be added by editing the menu. For more information, see the Customizing Layouts guide.
Submissions List
The Submissions list displays all configured submission forms in the system.
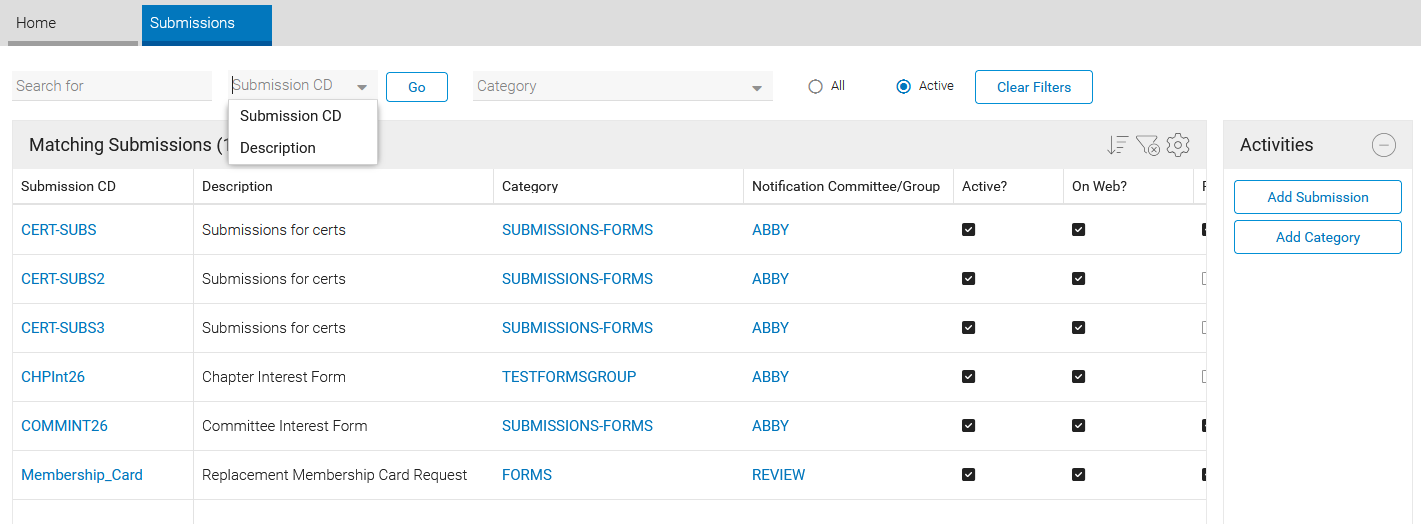
The list displays the following information for each submission:
-
Submission CD: The unique identifier for the submission.
-
Description: A brief description of the submission.
-
Category: The submission category this form belongs to.
-
Notification Committee/Group: The notification committee assigned to this submission.
-
Active?: Indicates whether the form is currently active.
-
On Web?: Indicates whether the form is published to the web.
-
Public?: Indicates whether the form is available to the public.
Use the "All" or "Active" radio buttons to filter submission forms by active status. Use the "Category" dropdown to filter by submission category.
To search for a specific submission, enter the "Submission CD", or select the "Description" option from the "Search By" dropdown and enter the description in the search field. Click "Go" to filter the list.
Submission Categories
Categories provide a way to organize related submissions within ClearVantage. Grouping submissions by category helps maintain a clear and organized structure, making submissions easier to locate and manage. For example, submissions related to applications can be grouped under an Applications category, while registration, volunteer, or request submissions can be organized into their own categories.
Create a Submission Category
To create a new submission category:
-
From the Submissions list, click the "Add Category" button in the Activities panel.
-
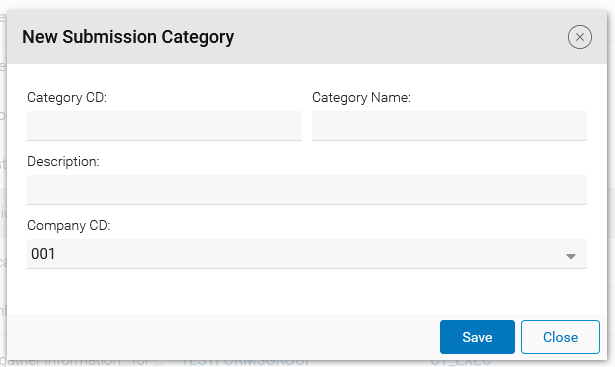
Complete the fields in the "New Submission Category" form.
-
Category CD: Enter a unique identifier for this category. The code may not contain spaces or special characters.
-
Category Name: Enter the public-facing name for the category.
-
Description: Enter a description of the category to provide clarity to internal users.
-
-
Click "Save" to create the category.
Edit a Submission Category
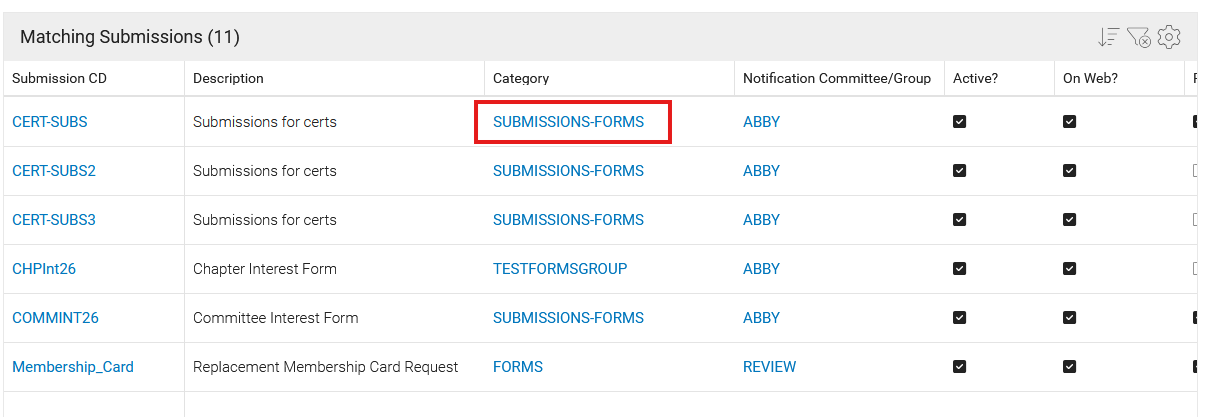
To edit an existing category, click the category code in the list. This opens a window where the category information can be updated.
Submission Configuration
A submission defines a specific type of form or process that members can complete. Configure each submission with a survey, document requirements, fees, and publishing settings.
Before creating a submission, ensure that at least one category exists. If no categories exist, create a category first. For more information, see the Submission Categories section.
To create a new submission:
-
From the Submissions list, click the "Add Submission" button in the Activities panel.
-
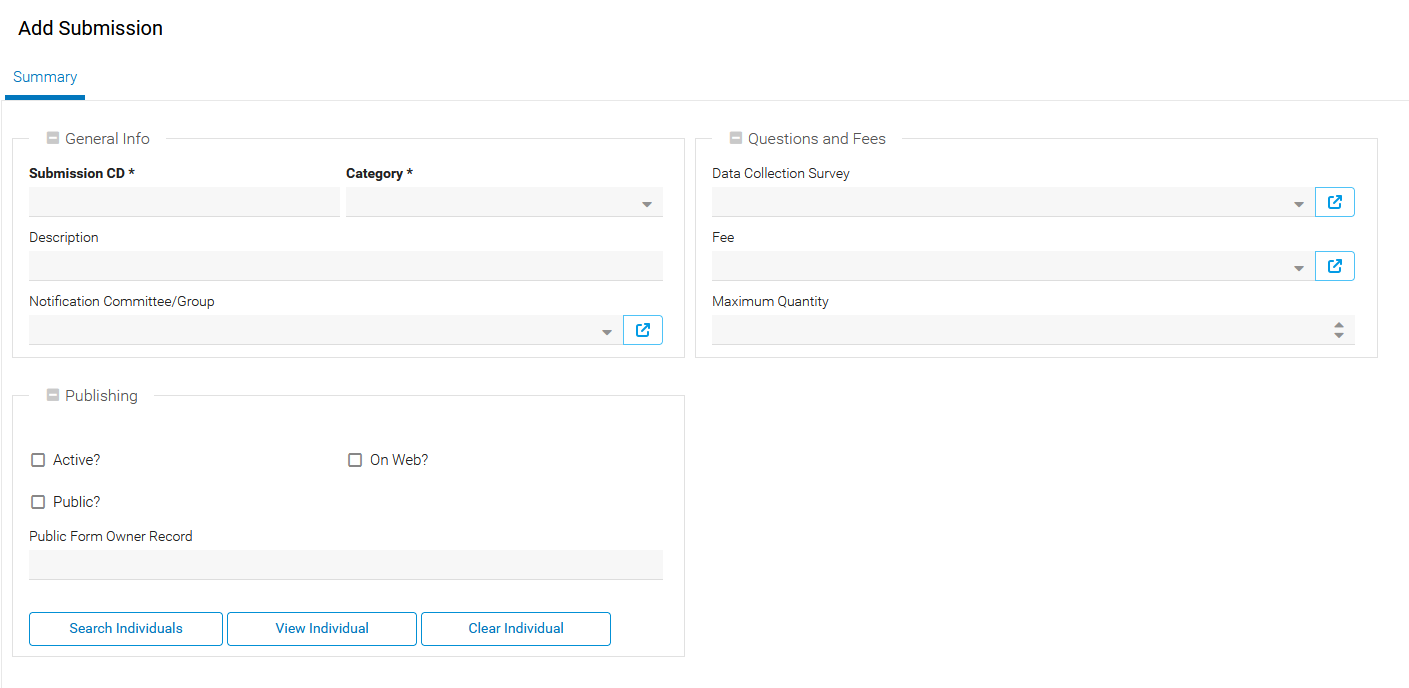
Complete the fields in the Summary tab:
General Info
-
Submission CD: Enter the unique identifier for this submission. This code may not contain spaces or special characters.
-
Category: Select the submission category this submission belongs to. Create categories using the "Add Category" button from the Submissions list.
-
Description: Enter a description of the submission.
-
Notification Committee/Group: Select a committee whose members will receive email notifications when submissions are received. Only active committee members (based on join and term dates) will receive notifications.
Questions and Fees
-
Data Collection Survey: Select a survey from the dropdown to collect information from submitters. The survey questions will display on the submission. Surveys must be created in the Survey module before they can be linked.
-
Fee: If the submission requires a fee, select a product from the dropdown. The dropdown displays products from the Products module.
-
Maximum Quantity: If submitters can select a quantity of the product, enter the maximum quantity allowed. If left blank or set to 0, the quantity defaults to 1.
Publishing
-
Active?: Check this box to make the submission active. Inactive submissions cannot be accessed on the web.
-
On Web?: Check this box to publish the submission to the web. Submissions must be both active and published to be accessible online.
-
Public?: Check this box to make the submission available to anyone, including non-members. When checked, a "Public Form Owner Record" must be selected.
-
Public Form Owner Record: Select an individual who will be designated as the owner for public submissions. Use the "Search Individuals", "View Individual", or "Clear Individual" buttons to manage this field.
-
-
Click "Save" to save the submission.
Managing Responses
View and manage submission responses from the "Responses" tab in the Submission Notebook.
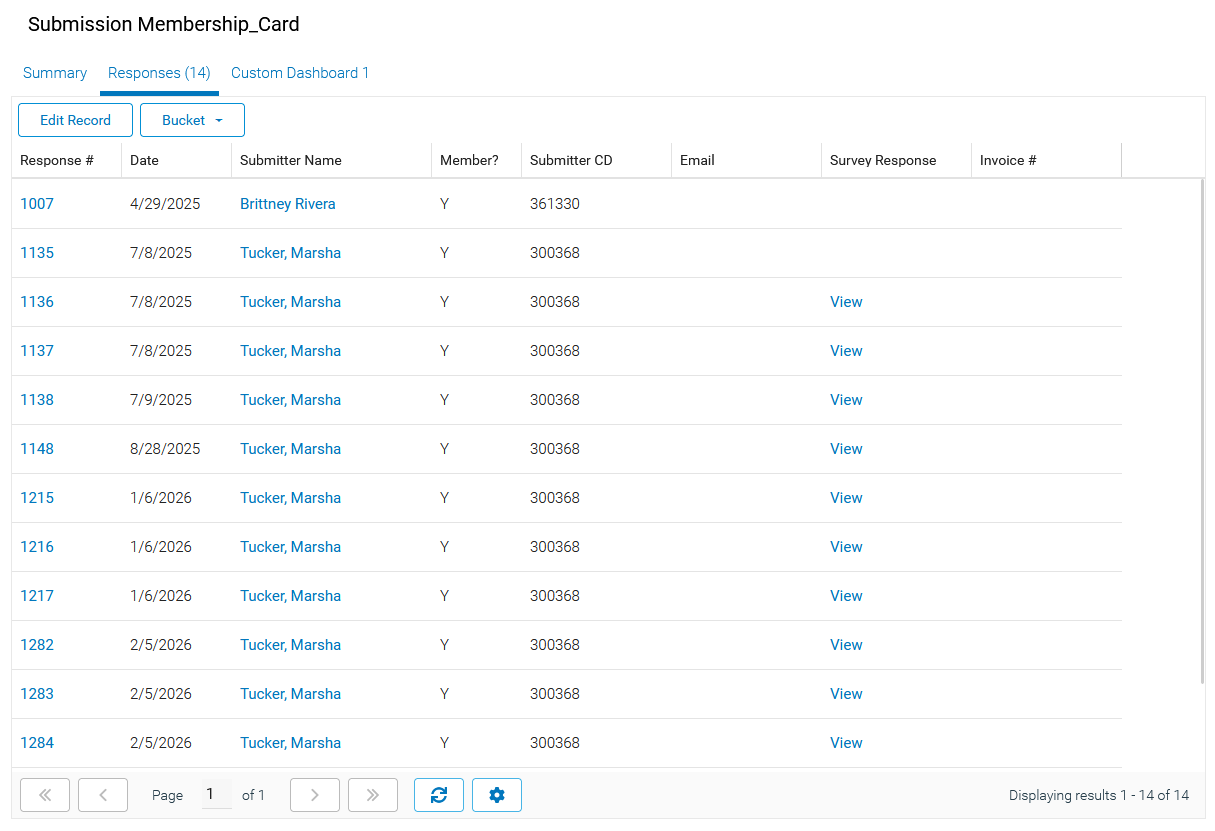
The Responses tab displays all submissions received for this submission. The list includes:
-
Response #: The unique document number for this submission.
-
Date: The date the submission was received.
-
Submitter Name: The name of the person who submitted the submission.
-
Member?: Indicates whether the submitter is a member.
-
Submitter CD: The customer ID of the submitter.
-
Email: The email address provided by the submitter.
-
Survey Response: A "View" link to open and review the survey response.
- To view a survey response, click the "View" link in the "Survey Response" column. This opens the survey response in a window.
-
Invoice #: A hyperlink to the invoice if a fee was charged.
Note
Use the "Bucket" feature at the top of the list to select one or more responses and work with the associated individuals in other ClearVantage modules. For example, registering the individuals for an event or adding them to a committee.
View a Response
To view detailed information about a specific response, click the response number in the Responses list. The Response Notebook displays all information collected from the submitter.
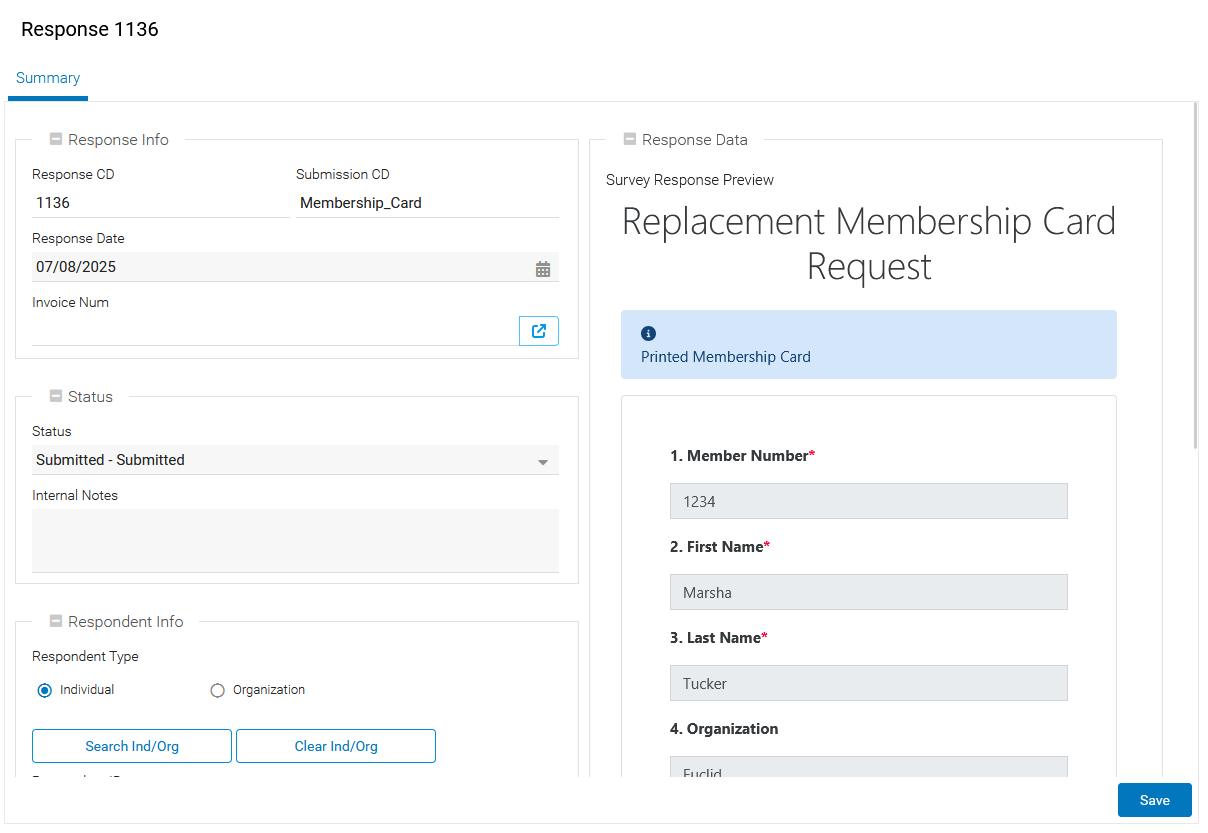
The response information is organized into sections.
Response Info
-
Submission CD: The submission code.
-
Response #: The unique response number.
-
Date Submitted: The date the submission was received.
-
Invoice #: A hyperlink to the invoice if a fee was charged.
Respondent Info
-
Submitter Type: Individual or Organization
-
Submitter CD: The customer ID
-
Submitter Name: The submitter's full name
-
Email: The email address
-
Phone: The phone number
-
Address fields: Address 1, Address 2, City, State, Zip, Country
-
Alt ID: An alternate identifier
-
Custom fields: Any configured custom fields
Status
-
Status: Select a status from the dropdown to track the submission.
Note
Default status options include: Submitted, Under Review, Approved, Rejected, Completed, and Cancelled. These can be customized in the Lookups reference table with the category of
SUB_RESPSTATUS. For more information, see the Reference Tables guide. -
Internal Notes: Add notes about this submission for internal use only.
Response Entry Errors
The following errors may occur when an individual attempts to create or update a submission response. These errors typically indicate that the submission is unavailable, inaccessible to the individual, or cannot be associated with a valid customer record. Review the error description and resolution below to determine the appropriate corrective action.
-
Error 001: The specified submission could not be found, or the associated category does not exist.
- Resolution: Verify that the submission is configured correctly and that the associated group exists. Confirm that the submission identifier is valid and active.
-
Error 002: The submission exists but is inactive.
- Resolution: Open the submission record and enable the "Active?" option. Only active submissions can accept responses.
-
Error 003: The submission or its associated group is not configured for web access.
- Resolution: Verify that the submission is published by enabling the "On Web?" option. If the submission is associated with a group, confirm that the group is also configured to be visible on the web.
-
Error 004: The user is not logged-in and the submission is not public.
- Resolution: Sign in before accessing the submission, or configure the submission as public by enabling the "Public?" option if anonymous access is intended.
-
Error 005: The submission is public, but the system cannot identify a valid customer record for the respondent.
- Resolution: Verify that a valid customer record can be associated with the submission. If using public submissions, ensure the "Public Form Owner Record" is configured correctly.
Notification Committees
When a notification committee is assigned to a submission, all active committee members receive an email notification when a response is received.
Active committee members are those with an "Active" status and valid join/term dates. Inactive committee members do not receive notifications.
Exporting Submission Data
To export submission data, click the "Export Data Survey" button in the Activities panel on the "Responses" tab. This exports the survey responses for all responses to the selected submission.
Submissions History for Individuals
Submission responses appear in the Individual Notebook for the submitter on a "Submissions" history tab.
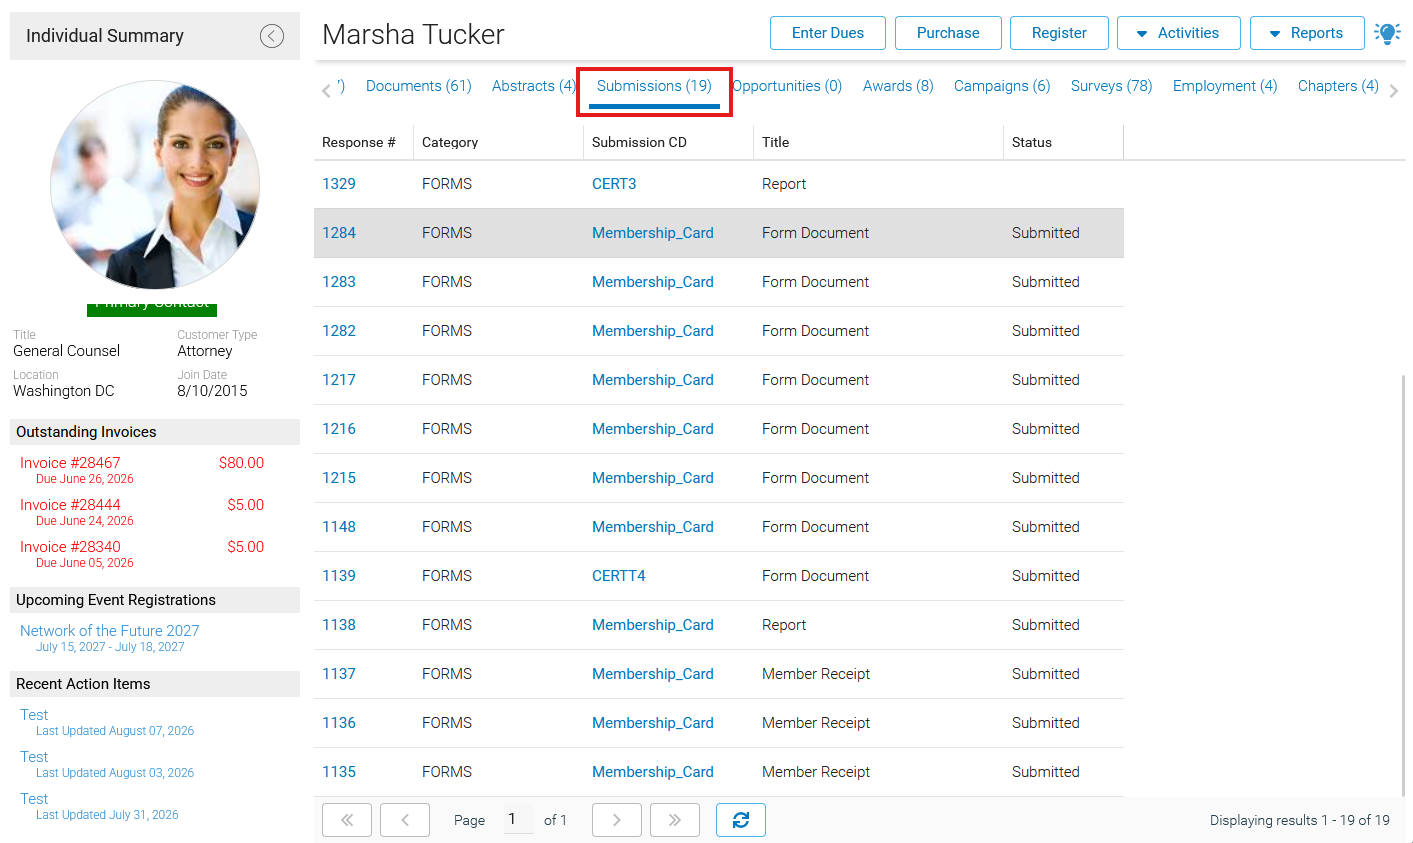
The Submissions history tab displays all forms submitted by this individual, including:
-
Response #: The document number.
-
Submission CD: The submission name.
-
Date Submitted: The submission date.
-
Status: The current status.